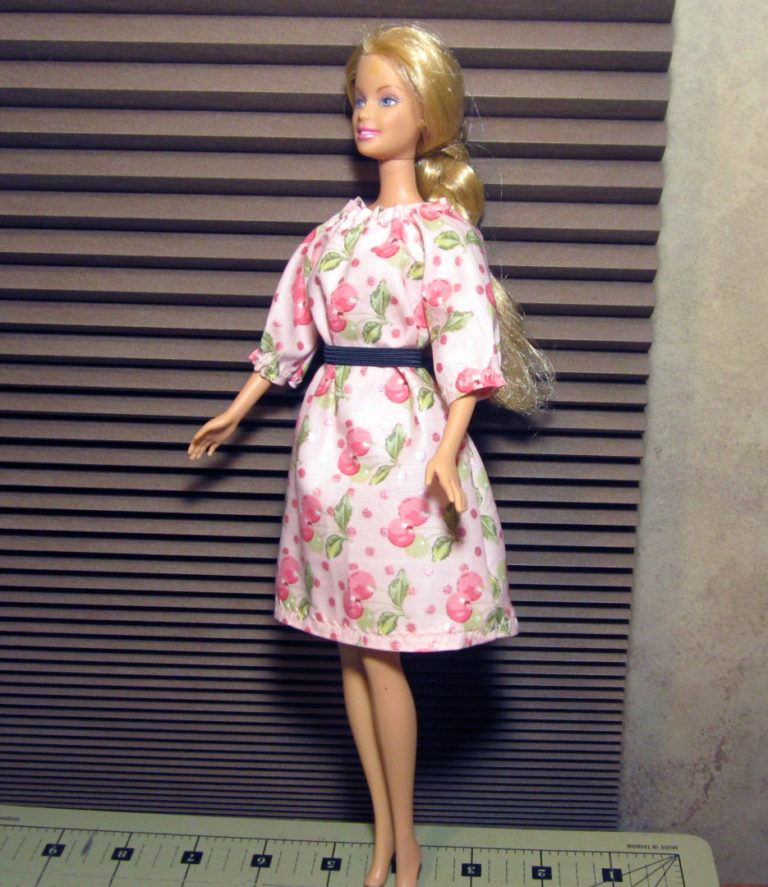
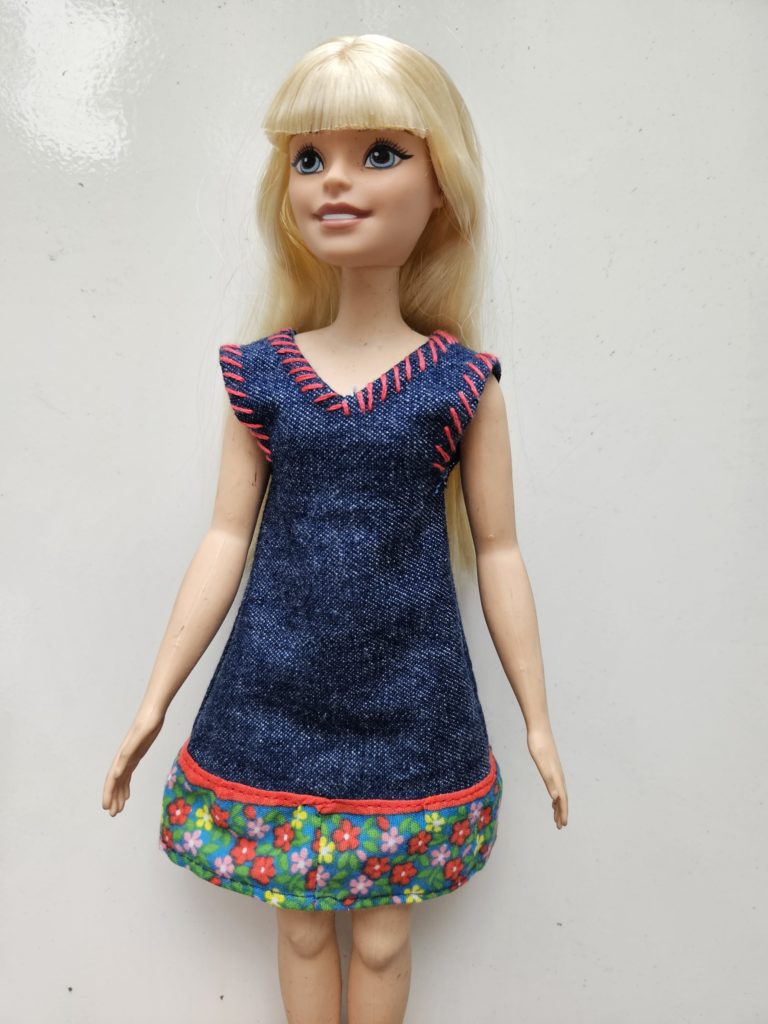
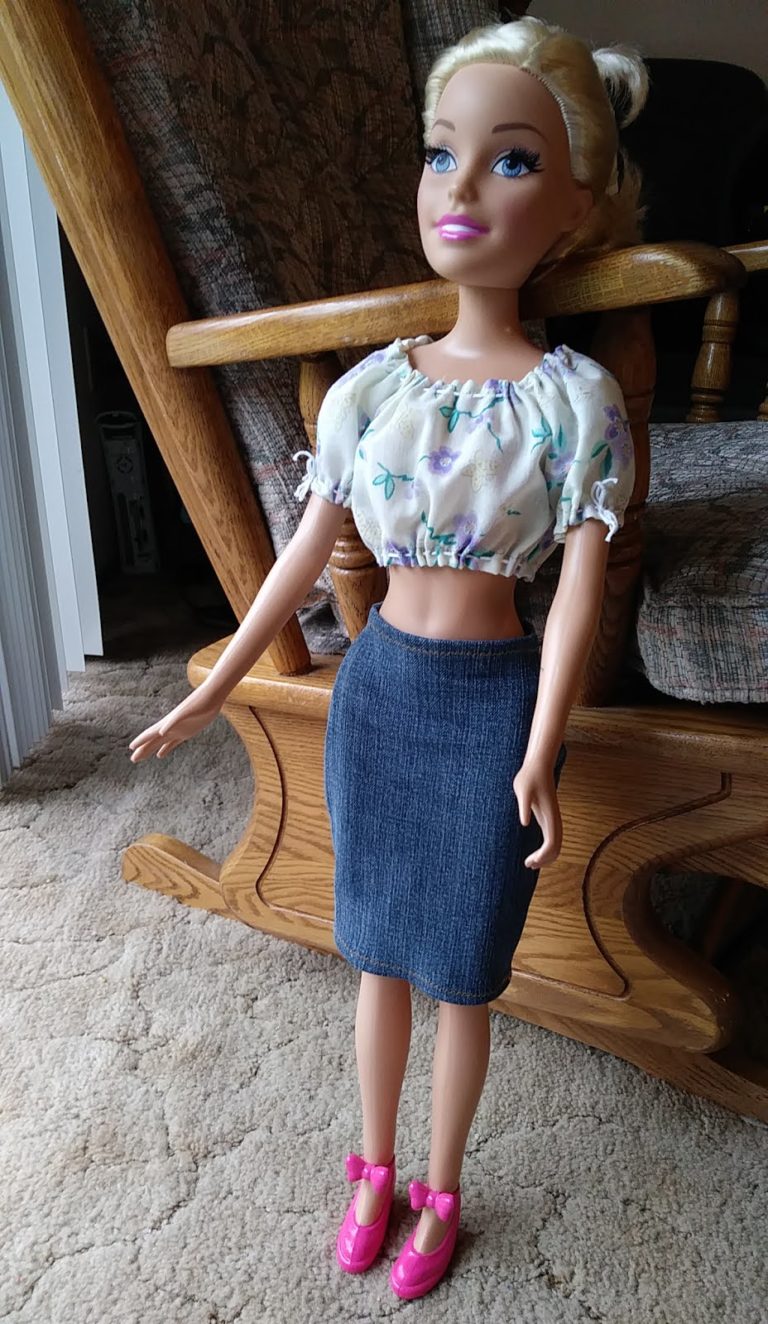
Author: Janel

  • Sharing 1962 Novel “Here’s Barbie” Excerpt

    Sharing 1962 Novel “Here’s Barbie” Excerpt

    About as different from that awful movie as it’s possible to get. In this first explanation of Barbara Roberts, she is a high school freshman, with only the most innocent, girly things to worry about, set in an idyllic America-of-the-past lifestyle. For her first meeting with Ken, he gets to save her day, and she wears flats.

    Honestly, this restored some of my affection for Barbie.

    This is the first story of the seven that you can read on archive.org.

    Chapter One

    The history of a friendship, like any good story, must have a beginning, and a middle, before you reach the happy ending. This story is about the beginning. It could start, “Once-upon-a-time, before Barbie knew Ken” because it partly concerns a fairytale princess and prince. But mostly it tells how Barbic met Ken, and this is just about how it happened. 

    Once upon a time, when Barbie was a new freshman in the big high school in a new town, she sat down at the breakfast table one cold February morning and sighed into her glass of orange juice. 

    “Come now, Barbie,” said her father, “things can’t be that bad so early in the morning.” 

    “Things are horrible,” answered Barbie glumly. “They couldn’t be worse. I wish we had never moved to this horrible town.” She crunched down vigorously on a piece of toast. 

    Her mother broke in, her voice gentle. “I thought you were beginning to get used to the town – and you said the high school was very nice.” 

    “It is nice, but oh, how I miss my friends! I’m such a stranger here.” 

    “It’s too bad you had to transfer in the middle of the school year,” said her father, “but give it time. We’re lived here just a week. You know,” he added, “it meant an 

    important promotion for me when my company transferred me here. I’m sorry it was so sudden, but the change will be good for all of us, you’ll see.” 

    “I know that, Dad, and I’m really not complaining,” Barbie answered. “But, well, tonight’s the first important school dance of the semester, and I won’t know a soul there!” Her blonde ponytail quivered as she shook her head sadly. 

    “So that’s it!” exclaimed her mother. “But Barbie, you do know someone. You’re going with Midge. I thought you liked her so much. You were so glad that she was your neighbor and that you could walk to school together every day. Besides,” continued her mother, “your costume is lovely. I know you’ll look your best and have a wonderful time!” 

    “Mother,” wailed Barbie, “it’s a Valentine dance and I’m nobody’s Valentine!” 

    “It’s also a Freshman Mixer,’ said Barbie’s mother, in that sensible way that’s special to mothers. “There’ll be many boys and girls who want to make new friends.” 

    “But Mother, we’re all supposed to come as part of a pair of Famous Romantic Couples and there won’t be any other half there for me!”

    “You’re going as Cinderella. Remember, she went alone to the ball.” 

    “Times have changed,” muttered Barbie. 

    “Not that much,” said her father. “You know, my little cinder girl, the only trouble with you is that you have a case of stage fright. Moving to this town is like a new act in your life and tonight you’re facing your audience. But all you have to do is be yourself and you’ll be fine!” 

    “I hope so, Dad!” 

    There was a call from outside the window. “Barbie! Are you ready?” 

    “There’s Midge,” said Barbie’s mother. “You’d better hurry or you’ll be late for school. And,” she added, “I’ll have a special surprise for you when you get home. Something for the dance.” 

    “Oh,” said Barbie, “you’re both dears. I will have a good time, I know.” She blew a kiss at her parents as she dashed out the door. 

    “It’s nice of your parents to take us to the dance tonight,” said Midge as they walked along the snowy streets. “Wait till you see my costume – I’m going for it right after school. I’m Pocahontas, with beaded moccasins and a red feather in my hair and everything! Bob Williams will meet us at the entrance, and he’ll be dressed as Captain John Smith. What fun!” 

    “That’s great, Midge,” answered Barbie warmly, looking at the small, rosy-cheeked girl who walked beside her. “You two do seem to have fun together.” Midge nodded, her curly brown hair bobbing in the wind. “Bob’s nice. There’s a whole crowd of us that go around together and do a lot of things.” She turned to Barbie and smiled. “Of course, you’re one of us now, too, Barbie. I’ll introduce you to everybody tonight!” 

    Barbie’s blue eyes sparkled. “Midge, I’m glad we’re going to be friends!” 

    The two girls, one a round berry of a girl, the other slender and fair, smiled at each other, then hurried down the windy street to school. 

    * * * 

    The school hours passed quickly. Barbie noticed that it was easier today to find her way through the corridors of the big high school, and that faces and names were becoming familiar. Now there were classmates who said hello as they passed her in the halls. Others included her in their lunch group. Barbie realized suddenly that she was beginning to look forward to the night. 

    Though it still feels strange, sighed Barbie as she walked home after school, passing the Pop Shoppe with its tables crowded with laughing, talking boys and girls. She thought of her mother’s surprise and her naturally high spirits rose again. It will be all right, she insisted, and walked on quickly toward home. 

    * * * 

    In the dark, chilly evening, the lights from the high school gymnasium blazed with a warm invitation as Barbie’s father stopped his car at the school entrance. He stepped out, opened the rear door of the cat with a flourish of his hand and a low bow and said, “Princess Pocahontas and Cinderella, your coachman awaits your pleasure!” 

    The two girls giggled as they left the car. Midge looked the very model of an Indian princess, and Barbie was resplendent in white satin, her ponytail bound up in silver ribbon. 

    “My,” said Barbie’s mother from the depths of the car, “I never dreamed my old evening gown would remodel so beautifully. I feel like a fairy godmother!” 

    “This is really where you waved your wand, Mother,” said Barbie, lifting up the hem of her gown. There was the shine of white satin at her feet as she showed her slippers with their slim, graceful little heels. 

    “I’m glad you liked my surprise, Barbie,” said her mother. “Just be careful when you walk. You’re not used to long gowns.” 

    “Oh, I’ve been practicing all afternoon. See!” And Barbie whirled around, her satin gown and slippers gleaming as they caught the moonlight. 

    “You do look like a princess!” exclaimed her father with pride. “But, look here, Cinderella, what time does the ball end?” 

    “Half-past eleven,” said Midge, looking excitedly at the lighted building. 

    “That’s fine,” said Barbie’s father. “The theater lets out at just the right time. We’ll be back here for you after the show.” 

    “Have a good time, girls,” called Barbie’s mother, as the two friends started up the school steps. 

    “We will,” replied Midge. 

    “We will,” repeated Barbie, ignoring the slight flutter at her stomach. As the two girls approached the top of the stairs, the sounds of music and laughter grew louder. They heard the car leave the driveway. 

    The freckled face of Captain John Smith broke into a grin as he caught sight of Pocahontas. Well, said Barbie to herself, hearing Midge’s happy laugh in return, I hope my Prince Charming doesn’t take too long in finding me! 

    “Hi, Midge, you look great,” said Captain Bob John Smith Williams. He saw Barbie and stopped, whistling in admiration. “Gee, Barbie, the scenery in town has really improved since you moved here! Wait till the stag line sees you.” 

    Barbie felt herself blushing, but Midge nudged her arm, like a proud mother hen pushing her chick forward. “I’m going to comb my hair, Barbie. Why don’t you dance this first dance with Bob?” 

    Barbie smiled at her gratefully as Bob said, “My pleasure,” and Midge waved her hand gaily and walked off. 

    Cinderella and Captain Smith entered the gymnasium, which was quite changed since Barbie had seen it that morning. Great red Valentine cutouts almost covered the high windows. Red and white streamers were looped from the basket at one end of the basketball court to the ceiling lights and to the basket at the other end. Napoleon and Josephine stood talking to Romeo and Juliet while Cleopatra waltzed by in Julius Caesar’s arms. 

    “Look at the fellows look at you,” whispered Bob as he took Barbie’s arm. “I’ll be lucky if we dance two steps before someone cuts in!” 

    “Midge says you’re wonderful dancer,” said Barbie, feeling her heart beat a little faster at the opening bars of “Stardust.” Oh, it’s going to be a wonderful evening, she thought, and I could dance all night. 

    Bob guided them toward the stag line. Barbie’s long shire gown floating behind her as they moved with the music. “Let me show you off,” said Bob, and he whirled her around. 

    The step was a little too fast, and Barbie’s head too high in the clouds. Disaster! Barbie’s heel caught in the hem of the heavy satin and down she fell, hard, with Bob sprawled in a heap beside her. There was a burst of surprised laughter from the boys behind them and Barbie felt her face flaming. 

    “Okay, you guys, knock it off,” growled Bob, picking himself up from the floor. “Are you all right, Barbie? I shouldn’t have tried that new step till I knew it.” 

    Two boys rushed forward to help, but Barbie still sat on the floor in misery. “I think my heel is broken,” she whispered to Bob. To herself she said, they laughed as me. 

    “I’ll take care of her,” said Bob to the rescue crew. With his help Barbie stood up and then limped off to a corner holding onto his arm. The music played on, but Barbie heard only an echo of laughter. 

    She saw Midge rush over. “Barbie, are you all right?” 

    “It was my fault,” insisted Bob miserably. 

    “Oh, no,” said Barbie. “I should have been more careful with my dress. I’m all right, Bob,” she continued, managing a smile. “Just let me sit here and catch my breath”. 

    Midge’s eyes were worried. “Are you sure you’re all right?” 

    “Of course. My heel is broken, but that’s all.” Except for my heart, she added silently. 

    “We could go home and get you another pair of shoes,” Bob volunteered. 

    “It’s no use,” said Barbie. “My parents aren’t home and I didn’t take a key.” 

    Midge silently measured Barbie’s slim foot. “I can tell that my shoes wouldn’t fit,” she sighed. 

    “Oh Midge,” and Barbie laughed, “I’ll be fine sitting here. Go off and dance – you can wave at me when you pass by.” Oh dear, thought Barbie in misery, and it’s just the start of the evening! 

    “Well…” said Midge slowly. 

    “I’ll send over company,” added Bob. “I’ve got a friend…” 

    “Oh, no,” answered Barbie hastily. “I mean, I enjoy just listening to the music.” 

    “All right,” said Bob, looking slightly puzzled. He tapped Midge’s shoulder. “Pocanontas, may I have this war dance?” 

    “Ugh!” said Pocahontas. He took her arm, and lightly they danced away. 

    Barbie watched from her corner, knowing that her cheeks were still hot and flushed while, strangely, her hands had grown cold. New act in my life, she thought, but the leading lady fell flat on her face! And I wanted so much to make a good impression! 

    Unconsciously she frowned and, biting her lip, looked up to see a tall blond boy walking in her direction. He wore the costume of an olden time prince and carried a dashing hat with a sweep of plume trailing from it. But Barbie ignored the pleasant face and, remembering the laughter, saw only one of the Horrible Boys from This Horrible Town. The frown became as cold a glare as Barbie could manage. The boy hesitated, stopped, looked again, then shrugged and walked away. They’re all so mean, said Barbie to herself, rather unfairly. And she huddled in her corner, sinking deeper in misery, and thinking, I wish, I wish I could go home! 

    The music played on and on, in a lively tempo, but the hands on the big gym clock moved with terrible slowness. For Midge and Bob, on their frequent visits, Barbic smiled and laughed. But to any brave boy who wandered to her side, her answer was short. *I don’t dance,” snapped Barbie, and the boy would retreat. Not with you, she’d say to herself, not with anyone who’d laugh at me. 

    And yet, and yet, the tall blond prince still hovered nearby. Barbie could see him out of the corner of her eye, and she’d quickly turn her head away. Why doesn’t he leave me alone? Unless be pities me for being so clumsy and looking so silly. If I could walk without hopping I’d go to the powder room. But she couldn’t, with her broken heel, so she sat frozen to the spot. 

    Oh! Oh! The boy was coming near, and his firm steps told her he was not going to walk away this time. 

    “I was wondering,” said the boy, towering high over her chair, “why the prettiest girl at the dance won’t dance with anyone.” 

    “Oh,” said Barbie, her manner airy, “I just don’t feel like dancing right now!” Is it possible he doesn’t know? 

    “Well, then, mystery woman, if you don’t mind, I’ll sit with you.” With a sweep of his dashing plumed hat he introduced himself, made a courtly bow, and sat beside her. 

    “Are you a famous princess?” asked Ken (for it was he), looking at the regal white gown and the silver ribbons in her shining blonde hair. 

    Barbie smiled hesitantly. “I’m Cinderella.” 

    Ken looked delighted. “It’s about time we met each other. Prince Charming, at your service!” Barbie stared at him suspiciously. Are you really?” 

    Ken’s smile came easily. “Well, I usually don’t wear this outfit to football practice, but I was dope enough to leave my costume to my mother, and this is what she came up with!” He grinned, making the story of the costume seem like a good joke for the two of them to share. 

    Barbie, forgetting that she was miserable and he was Horrible, laughed in amused sympathy. 

    “Well,” said Ken, “that’s better! That’s the first time I’ve seen you laugh all evening.” And he blushed. “I don’t mean I was watching you all the time. I mean – oh, well, I was watching you!” 

    Barbie made a face. “Then you must have seen my graceful entrance.” Somehow it wasn’t so bad talking about it to him. 

    “Your entrance?” Ken looked puzzled, “No, I came a little late. I saw you sitting in the corner and I decided I wanted to find out who you were. You weren’t very encouraging,” he added bluntly. 

    He was too honest for her to continue hiding her hurt pride. 

    “I broke the heel of my slipper. I fell – and made a fool of myself!” She hadn’t meant to say that last part. 

    Ken looked relieved. “So that’s why you didn’t dance! Your slipper broke.” Then he said anxiously, “You didn’t hurt your ankle?” 

    The misery came back. Barbie lowered her head. “No, not that. But everyone laughed, I was so embarrassed.” 

    Ken looked at her closely. When he spoke his voice was kind. “Well, if all you hurt was your dignity, that’s not so bad.” He paused and thought. “Cinderella with a broken slipper.” He looked at her with amusement, then remembered and made a desperate effort to be solemn. Barbie saw the quick change of face, and that brought out her own smile. 

    “Please laugh if you want to,” she said. “I imagine it did look funny. I wonder whatever happened to my sense of humor.” 

    “I suppose,” said Ken, “that princesses are expected to be perfect and very proud. I think I’d have liked Cinderella before she became princess. I like a down-to-earth girl.” He stared very directly at Barbie, and she found her face growing warm again. This time it was surprisingly pleasant. 

    “I’m very down-to-earth,” she said. “I don’t even have a shoe.” 

    He frowned. “We’ll have to do something about that. This music is too good to waste.” 

    “It’s hopeless,” sighed Barbie. “I can’t dance around the gym on one heel.” 

    “Gym!” exclaimed Ken. “That’s it! Don’t you have gym sneakers in your locker?” 

    “Sneakers?” Barbie looked horrified. 

    “Sure. That way you can dance.” 

    “But I’d look so foolish.” 

    “Not to me,” said Ken sternly. “And I’m more important than a broken slipper.” He stopped. “At least, I hope I am.” 

    Barbie looked at him helplessly, then she laughed. “Yes, you are. And thank you for reminding me.” 

    Ken offered his arm. “Okay, Cinderella Take off that broken old glass slipper and let’s find your locker.” 

    Barbie rose and, with just the slightest suggestion of a limp, walked grandly to the door, holding onto Ken’s arm. 

    * * * 

    The music lovely, and she could dance all night, thought Barbie as she whirled around the floor in Ken’s arms. She felt light, so light. It must be those bouncy rubber soles, she said to herself, and giggled inwardly. 

    “Why are you smiling?” asked Ken. 

    “I never knew that magic slippers were made out of canvas. Is anyone staring?” 

    “They all are,” said Ken. “Every fellow is looking at you – and envying me.” 

    “I was so nasty. You were very brave.” 

    “I’m a glutton for a damsel in distress.” 

    They looked at each other, then danced silently for a moment. The light overhead blinked. 

    “Oh, oh!” said Ken. “The ball is over!” 

    They stopped and slowly began to walk off the dance floor. 

    “Barbie.” It was Midge’s voice, and there was a strong note of relief in it. She and Bob hurried over. “I’ve been looking for you. Oh, Ken – I didn’t know you two knew each other!” 

    “He found my glass slipper,” said Barbie, in decidedly giddy voice. 

    “What?” said Midge. 

    “Look!” Barbie lifted her gown to show two very un-elegant gym sneakers. 

    Midge gasped. “You mean you’ve been dancing like that all evening?” 

    Barbie and Ken smiled at each other, Cinderella and Prince Charming to the very life. 

    “Of course,” said Barbie, with a perfectly straight face. “It’s the only kind of glass slippers I ever wear.” 

    The lights overhead blinked again. Barbie glanced at the big gym clock. 

    “Midge! It’s after eleven-thirty. My parents will be waiting downstairs in the cold!” She turned anxiously toward the door. 

    “Hold it, princess, hold it.” Ken took her arm and drew her aside. “Either leave me your sneaker, like a good Cinderella, or your phone number. I’d rather have the phone number” 

    Barbie’s eyes twinkled. “I never thought you’d ask.” 

    Ken looked reproachful. “You know I’ve been wearing my heart on my sleeve all evening, and not just because it’s Valentine’s Day.” 

    “That’s right. It is nearly Valentine’s Day!” 

    “Every day from now on.” 

    I guess there’s more to a magic evening than glass slippers, thought Barbie. What it really took to make it magical for me was a good shaking up! 

    She smiled happily. “Good night, Ken!” 

    “Good night, Barbie – and hello! 

  • Protein Cookies Recipe: Going Unsweetened

    Protein Cookies Recipe: Going Unsweetened

    My daughter showed me Granny Guns on Instagram and I wanted protein cookies. Her recipe is a bit too focused for me. Restate: I wanted cookies with protein in them. I searched in some of the recipes on protein powder brand websites, then as usual went away and did something different.

    This is the easy-to-remember recipe I use all the time, with just a few things changed.

    Some of the need for sugar in cookies is to overcome the taste of the wheat. It’s so much nicer if you start off nice, with yummy, mild, spelt flour or oat flour.

    Ingredients:

    2 eggs
    1/2 cup butter
    1/2 c honey
    1 c peanut butter
    1 c protein powder
    1.5 c flour (spelt or oat)
    2 tsp vanilla
    1 tsp baking soda
    big handful chocolate chips

    It comes out the consistency of play dough and really can’t be mixed with a spoon. Put on a glove and knead it.

    About that time, I gave up sugar again. How many times does this have to happen? Will it never end? Probably not, and there’s some peace in acceptance. I give up sugar, and some time later I’ll have to give up sugar again, and suffer the cravings for a while, and get all the way past it again, and feel so good, again, and later, I’ll have to quit sugar again.

    I don’t do moderation. That’s not how I roll. Quitting sugar means quitting sweetener, or else it’s a slippery slope straight back.

    Last time I quit sugar, I made some chocolate chip cookies for my dear husband and watched him eat them, and then realized how stupid I was being.

    I only want to give up sugar! I don’t want to give up chocolate chip cookies.

    Unsweetened desserts. Pie, cake and cookies without sugar. Is that even a thing? Don’t see it on internet. They all have alternative sweeteners. How about just forget the sweetener. Spelt flour tastes nice, butter tastes nice, cooked eggs are all right, and mixed together and baked, they still taste nice. With some warm tea and a crossword puzzle, I want nothing more.

    Those protein cookies without the sweetener goes like this –

    2 eggs
    1/2 cup butter
    1 c peanut butter
    1 c protein powder
    1 c flour
    2 tsp vanilla
    1 tsp baking soda.
    big handful chocolate chips (those 90% cocoa ones are about as unsweetened as you can get)

    And look like the same basic deal. They are unavoidably sweetened a little bit by the stevia in the protein powder, and you’d have to do backflips to find affordable unsweetened protein powder. Stevia doesn’t hurt.

    When you detox from sugar, unsweet things start to taste better. These taste satisfying. They taste like, “This is me, eating thick cookies in the morning.”

    Next try was unsweetened pie. Here’s two pies. Husband’s one is canned peaches, flour, sugar, cinnamon, with flour, sugar and butter crumbs.

    Mine is canned peaches and pineapple (because that was all the canned peaches), flour and cinnamon, and flour and butter crumbs on top.

    Whipped some cream. Fresh cream with a little vanilla is DELICIOUS and satisfying.

    Howzat for food photography XD

    And then some leftover whipped unsweetened cream with crumbled unsweetened cookies and a can of mandarin oranges. They were in a sugar syrup. Draining them is the best I can do right now.

    There’s my “as little sugar as possible” lifestyle!

  • Great Cocoa Marshmallow Cookies

    Great Cocoa Marshmallow Cookies


    I went looking for marshmallows without pig to make smores. The health store had only mini marshmallows. I bought them rather than my quest end fruitless, but you can’t really make smores out of those (except in the oven, which isn’t as romantic).
    A few months later I discovered them at the bottom of a box, and made these cookies for the darling.
    He says they were awesome.

    It’s only a variation on the regular chip cookies recipe.

    Literally the only difference is 1/2 c of the flour is cocoa powder instead.

    Cocoa powder is a low calorie superfood!

    1/2 cup butter
    2 eggs
    1 cup brown sugar
    2 tsp vanilla
    2 cups spelt flour
    1/2 cup cocoa pwd
    1 tsp baking soda
    1-1/2 cups mini marshmallows

    I never read the instructions anyway. You’ve made cookies before, right?

    Bake at 350 deg until done.

  • Barbie One Size Fits All Sewing Patterns

    Barbie One Size Fits All Sewing Patterns

    I see a real need for this. It’s a simple, easy dress to fit any Barbie shape. We have a pile of naked Barbies! They need clothes quick, and they should be able to share. Let’s go.

    Here’s a pull-on shift dress, about as basic as it can be. The other is a basic peasant dress with Velcro closure. Both have only one pattern piece.

    I’ve tested with Bellybutton, Original/Vintage and Curvy. I don’t own a Disney Princesses doll to test. Curvy and Lammily are similar dimensions, and the shift pulls on over Curvy’s hips exactly right, so I bet it would fit Lammily, and the peasant dress definitely would. I’m confident it would fit Fashionistas Tall and Petite. I also have a 10″ slim fashion model doll called Zuru Glitzees Princess with a tiny 2.5″ waist. It’s a bit generous on her but fits well enough that it’s acceptable to play with, and that’s the point: sharing, and playing dress up together.

    NOTE scroll down for Swing Dress too!

    The shift dress doesn’t even need any fastener. It takes literally a few minutes to make on a sewing machine.

    It can be a gown if you use shiny fabric, or it can be playful in a print. It’s a blank canvas for your decoration. Try patchwork, lace, whatever.

    I’m actually excited about this.

    I mean, I understand that the 1966 Barbie shape needed an update. The 1999 Bellybutton Barbie was a good solution. There were no patterns for the new shape at first, so I made one up and shared it. Then Simplicity came out with a couple paid ones that were extremely cute. Okay, now there’s a new shape and there are patterns. I would have called that done.

    But they just couldn’t leave well enough alone, and now there’s a crazy variety of body shapes and sizes, all called Barbie, so that, like a bird watcher, you need a field guide with a flowchart to help you figure out which species any particular girl is. That’s kinda nuts.

    I’ve had some troubles that kept me busy for a while, and my also, baby girls grew up. But I’ve liked sewing for dolls since I was little. When I had a moment, I came back and looked at the internet to see if there were any spaces that needed a contribution from me. It didn’t seem so. All those new bodies have been covered (haha) with tons of patterns.

    The one thing that hasn’t been done is to sweep all that aside and offer a solution to this nonsense: ONE dress to conceal the nakedness of any approximately-Barbie.

    I don’t think adult hobbyists will be interested in this. Grown ups who sew doll clothes for art’s sake probably have money and time for beautiful, complex patterns. I enjoy admiring their masterpieces, but what I’d like to do is help out the moms and grandmas who need something simple and quick that can expected to fit their “11.5 inch fashion doll”.

    Can there really be a cute dress from just one pattern piece to fit any doll? Well, here it is. Not once but twice. So that’s my contribution and I’m happy again.

    I’m looking forward to making more models and more designs. I’d like to turn the halter dress into a OSFA too.

    But I am in such a rush right now! Life’s moving, we’re moving. We have difficult but possible challenges that we must rise to meet. I’ve gotten this project this far by thinking about it before falling asleep, then working on it in snatches of stolen time when I should be doing real life stuff.

    Let me know if you have suggestions.

    I want to do something like this for the 28″ dolls too, Barbie, Curvy, and Descendants. I already have a peasant top for 28″, it just needs a wider skirt and there we go. I haven’t made anything for 28″ Curvy Barbie yet! She’s been lying in a dresser drawer for a year. Must sew. Possibly… summer 2023? Or when I get snowed in, winter 2023 which I’m looking forward to 🙂

    The Patterns are HERE

    Free printable pattern in PDF format – Barbie OSFA shift dress for all 11.5″ tall dolls.

    And here’s the pattern for Barbie OSFA peasant dress

    Instructions for Shift Dress

    Use lightweight fabric that won’t fray much. Cut the pattern piece on fold.

    Make tiny clips at the corners where indicated

    Fold over barely 1/4” at neckline and armhole edges and topstitch. (“Barely” means “almost 1/4″ but not quite, and definitely not as wide as half your presser foot”)

    Sew side seams together, up to the clip

    Add a bottom ruffle at this point if you’re doing one.

    Sew up back seam to the clip

    Hem the bottom.

    Instructions for Peasant Dress

    Cut one pattern piece on fold of fabric.

    Make tiny clips at corners where indicated

    Fold over neckline and sleeves shy 1/4“ (almost 1/4″ but err towards the narrow side) and zigzag over a piece of cord, then pull up to the measurements given (printed on the pattern for your convenience if hand sewing while travelling) – sleeve edges 2.5 inches and neck to 5 inches.

    Sew side seams.

    Fold over back edges to finish, then add velcro.

    Narrow hem or a ruffle – in the picture I used a piece 2” x 16”

    2024 – Swing dress fits ALL

    It’s a lil bit wider around the armpits, more graceful around the sleeves and shoulders, and absolutely FITS (definition of fits – easily goes on) 13″ First Barbie, 12″ Darci / Jem, 11.5″ all Barbies incl Curvy.

    The shift dress doesn’t fit First and Jem, but the swing dress does.

    Here’s the whole range:

    MGA Ella (Bellybutton body) in swing dress, 2006 11″ short Barbie in shift dress, 13″ First Barbie in swing dress
    Jem (Darci) in swing dress, Curvy Barbie in shift dress
    Glitzees in shift dress, MGA Ella in swing dress. That’s a hairband for a belt.
    First Barbie in swing dress, Jem (Darci) in shift dress (but it was hard to get on her), Glitzees in swing dress.

    Pattern for 2024 Swing Dress

    Swing dress, 2024, for 13″ First Barbie, 12″ Darci/Jem, 11.5″ everybody

    Just the pattern piece PDF file, make sure to print 100%, not “fit to page”

    Fold over and stitch neck and arms, then side seams, fold over back edges and use velcro

    Story to make a point

    When I was maybe nine or ten years old, a girl came to stay at the place across the road and we compared Barbie collections. Mine was fabulous compared to hers – I had busy parents, and a brother and sister 16 and 19 years older than I was who both had jobs – she had only a mother. What she had that I didn’t was a grandma. So, my collection consisted of Mattel everything, bought new. But she had one particular dress that was handmade by a grandma, from an interesting-textured Hawaiian print. It was basically a tube with a ruffle, but it was HANDSTITCHED by a GRANDMA. Envy so possessed rich little me that I was ready to give “anything” / everything necessary to swap for that, and I eventually got it, in exchange for a huge pile of store-bought gowns and accessories.

    Years later, I realized what I had done, and if there had been any way to find that girl and give that grandma-made dress back, I would have.

    The point is, that’s the value of a handstitched Barbie dress to little girls. Tailoring and “looking right” to the eyes of adults is a different thing.

    Slow Stitching

    Slow stitching is a newish, cool idea, rather to sewing what zentangle is to drawing, when the activity isn’t a need any more, only a way to soothe yourself. Basically take scraps of fabric, lace, buttons, and stitch them together with no particular purpose but joy and beauty.

    I love the relaxing quality of handling textiles, but I don’t think I can relax to the point of COMPLETELY wasting time. Stitching with NO results in mind doesn’t attract me.

    In old times, women always had their workbasket nearby, so at any slow moment they could make a little progress. When boring people are talking? Stitch. When riding in any conveyance that you’re not the actual driver / pilot? Stitch. Movies that are more about the company than the movie? Stitching away here. Or while enjoying audiobooks.

    They sell beautiful kits with coordinating pieces, or we can carve fabrics and trimmings out of all kinds of things.

    Here are a couple random images I could find with sharing allowed. If you search for “slow stitching” you’ll find the really pretty stuff.

    Crazy Quilt (ca. 1940) Edith” by National Gallery of Art/ CC0 1.0

    Crazy quilts were slow stitching projects for rich Victorian wives.

    https://www.flickr.com/photos/lovefibre/2258569576

    Anyhoo. I have a vision for slow stitching and Barbie clothes. Once this pattern is at the place where I trust it, I find it VERY relaxing to stitch the whole thing by hand. It’s actually easier by hand, and works out faster in that more models tend to get done sooner than if you’re waiting for time to sit down in front of the sewing machine.

    There were a few blissful days this summer when I needed to stand by to help Darling with his construction project. There’s me stitching in the shade on a hot day, and a dress I’m pretty sure would not have been gottn around to being made otherwise. Good times.

    Just ONE pattern piece is great for portable sewing. No little pieces to lose!

    (Crochet has always been the same thing. Only imagine if they made a crochet machine, but sometimes we choose not to use it.)

  • My First Barbie 13.5″ Free Printable Sewing Pattern

    My First Barbie 13.5″ Free Printable Sewing Pattern

    Oh guys, it’s been a journey, I must say. More about that later. At the moment I’m *grateful* that I still have technology enough to produce a reasonably decent printable pattern. We have moved off grid, kind of feels like we fell off the world computer-wise. I have Android and a little solar battery and it’s harder than it used to be with a lot more steps, but it’s doable. Just more challenges to overcome makes it more satisfying, right?

    So. A new “preschool” version fashion model doll, two inches larger than the usual one.

    I liked her, and must make something for her. Let’s go. We need clothes!

    Here’s what I have so far. Just a basic short, cute shift dress with dressing-up possibilities.

    It’s another one piece masterpiece, super easy. Cute stuff can be made with it, you’ll see, I’m working on a couple more models! And maybe I’ll make her a more structured, tailored, fashionable, multi-pieced, fiddly, difficult outfit later. We’ll see.

    Download the pdf, it’s letter size 8.5×11″ and print at 100% scaling. It has some instructions on it.

    I’ll add more pics here as I work on the next model. If you make something cool with it, share a photo!

    PLEASE NOTE THIS IS NOT FOR THE USUAL SIZE DOLL – only for 13.5″ tall Barbie. If you aren’t sure which doll you have, try the “One Size Fits All” dress!

    There are some instructions on the pattern.

    She also fits the one-size-fits-all pattern which is here…

  • Denim skirt for Barbie BFF 28″

    Denim skirt for Barbie BFF 28″

    By request! Here’s a cute country girl look. The crop top is the peasant pattern shortened a little and elastic added, and here’s a pattern for the slim denim skirt.

    That’s the first draft. I finally got around to testing it again!

    I’m off grid at the moment. At least I have my tablet and a folding solar panel, so I used the lovely Ivy Draw, cool vector editor for Android that I’ve talked about here, to make the pattern and print as a PDF.

    Make sure that line comes out 3 inches.

    It goes together in a snap. Stitch the darts, join side seams, fold over and zigzag all edges, add velcro.

    I also have another cute skirt in mind, a little yoked, ruffled miniskirt, and that was in the drawing and testing phase when I moved to the frozen north. But things are getting a bit better, at least I have my lovely sewing area together (if by battery light) so hopefully I’ll get to it soon, because it’ll be fun!

  • Spiral Lace Single Crochet Mat

    Spiral Lace Single Crochet Mat

    Therapy crochet while I listened to a message at home. I started messing with dishcloth cotton because I need some more dishrags, kinda reinvented the wheel (this basic sc lace doily idea’s been around since early times) but then added another petal in between to make twelve instead of six, and AFAIK that’s new. I’m pretty happy with how this came out.

    It’s a nice easy to remember formula, so I’ll be making more. It seems like it could go bigger and gain more points without losing shape. I might try it sometime.

    Multicolor pinwheel cotton dishcloth or mat
    Bit rough, do forgive. I’ll polish it more after a while.

    My idea of a crochet pattern is just the stitches, not how to join them. So the instructions are short.

    Ch6, join to form a round
    In one loop of each chain, (2sc, 1ch) six times around
    (1sc in each sc, 1sc in chain, 2ch) six times around
    After that, skip the first sc, sc in ea sc, 2sc in the chain, then half as many chain as sc, generous [Meaning, if there are 5sc, use 3ch]
    Continue like that to the end of the round with 7sc
    The next round, (4sc, 4ch, 4sc, 4ch) six times around
    Then (5sc, 3sc) twelve times around
    Etc

    I went up to 8sc x 12 and that was 9″, a nice size for a dishcloth. I was using size H crochet hook.

  • Crochet Openwork Octagon Square Motif

    Crochet Openwork Octagon Square Motif

    Built from the septagon mat, but I decided to make this a separate post. I was so tickled with how the septagon design looked that I wanted to make some more using flower colors. Good luck joining seven sided motifs, so it had to turn into eight. But a square is simpler! While messing around I also changed the petals a bit to be all dcs instead of having two tcs just because I don’t like tcs, but that’s kinda random and I’m not determined on it. The previous petals were fine.

    Blue and green octagon to square openwork crochet motif

    Since I dislike those long, many-yarn-over stitches to form corners, I made four loops to dc into. I crochet mostly for relaxation. Dcs can be done without looking at them, hence are calming and the other things are not <– opinion. The only round of this design that takes any thought while working, then, is the round with the petals, as you have to remember to put corner loops on every other one. Other than that, easy to remember and brainless to stitch. If it was 1% more complex than this I probably wouldn’t do it. I do simple.

    Here we go.

    Octagon to square openwork flower crochet diagram

    Explanation of rounds:

    1. Chain five, join to form a ring.
    2. (1 sc, ch 6) into ring eight times
    3. 5 sc into each loop
    4. (1sc into center of 5sc, ch 6) around eight times
    5. 7 sc into each loop
    6. (Skip first sc, into each of next two make 1dc and 1ch, then 1dc, then a 5ch picot, with the slip stitch right into the top of that dc, then ch, dc, ch, dc, and skip last sc) around eight times
    7. (Sc into first dc, ch5, (dc, ch5, dc) into the 5ch picot, ch5, sc into first dc of next petal, ch5, sc in middle dc, ch5) repeat around four times
    8. 6sc into each of all those ch5 loops

    Did I type that out right? Let me know if you spot a mistake. I’m writing that down three days after losing interest.

    They’re so pretty! But the idea is “solved” and I’m moving right along.

    I actually thought of this (how to turn the septagon flowers into octagons in squares) before falling asleep and then lay there for an annoying hour on that edge of wondering if the idea would still be there next morning or if I should get up and write it down. Yes, I remembered it the next morning. Made these nifty little worsted-weight confections and then that’s it. Blog about em and put em away. Maybe I’ll find a great use later, maybe make a bunch in the same color pattern for a throw. Join-as-you-go would work well.

    But I’m making cold weather gear right now! Winter is coming. Not this winter; for the rest of 2022 I’m back on the rainy side again, the west of Mt Rainier where the clouds pile up. It’s been pooping big piles of snow but usually doesn’t get below 20 F here. Next winter, God willing, we’ll be out in the c-c-c-c-cold in a trailer. Must sew.

  • Crochet Openwork Septagon Counter Mat

    Crochet Openwork Septagon Counter Mat

    I wanted, not a dishcloth, but a cotton round to lie on the kitchen counter for cushion under pans and things. I wanted it openwork for more ventilation.

    1)   Dig through the internet for two hours  2)  There’s nothing like that  3) Invent something.

    Not that I really cared until I started, but there aren’t many septagon doily patterns out there.  I don’t favor six points, and eight points is too many, so if I’m going to make this up by myself it might as well have seven. And I’m only going to say heptagon if the month after August is Heptember.

    I like how it worked out. Seven sides, seven scs in each loop. It’s a very perfect pattern!

    I like how it resembles a flower. If the center was yellow, the petals rose and the outside green it would look even cooler but these were the only scraps of dishcloth cotton that I had handy at the moment.

    Shorthand version of a pattern…

    (sc = don’t yarn over,  dc = yarn over once,  tc = yarn over twice)

    Round 1: Ch4 and join into a ring
    Round 2: (1sc, ch5) seven times around
    Round 3: 5sc in each loop
    Round 4: In the middle sc of the five (1sc, ch6)
    Round 5: 7sc in each loop
    Round 6: Skip 1st sc, then in the next 5scs do this – 2dc, 2dc, 2tc, 2dc, 2dc
    Round 7: 1sc in first dc, ch6, 1sc in second tc, ch6, repeat around
    Round 8: 7sc in each loop

    And here’s a diagram:

    Septagon crochet mat pattern

    Update early next morning: those three mats on the counter made me smile. They’re happy-making! 😊

    Update late next morning: I find them naturally in use. Even the phone has a coaster. Now maybe we need one more–?

  • My Homemade Hand Crank Singer 403A

    My Homemade Hand Crank Singer 403A

    Could it be this easy? Just add a knob to the hand wheel? I didn’t know, but the motor doesn’t work any more, so there was nothing to lose by trying. I drilled a hole in the hand wheel and attached a bit of dowel with a screw. Voila, a modern zigzag hand crank sewing machine, most useful for my small trailer where I don’t have room for a treadle base anyway.

    (Even if I still had my treadle base, which I don’t.)

    Turning the wheel around by hand is tiring, but easier than hand sewing, and slow, but faster than hand sewing.

    It worked just dandy on my most recent trip to our cold new home, where at one point I needed to hem a piece of heavy canvas. Doing it with a machine surely did save my fingers.

    “If it’s stupid but works, it isn’t stupid.”

    Very handy for sewing on the floor! No cord needed, and no presser foot. Here it’s stitching up a semi-rigid window blind.
  • About Me

    About Me

    I’ve had some kind of block lately and have to force myself to write. This is an exercise. “Write something.”

    The website name was an exercise in self-acceptance many years ago. I grew up disliking my name, but later realized that might have been because my mother only called me by it when she was angry. When she wasn’t angry, it was some cutesy endearment instead. “Janel!” was the call of adrenaline. But there’s nothing wrong with the syllables, so I decided to make an effort. If I’m going to like myself, then I must like Janel.

    I was born in western Washington, and thought it was okay because I didn’t have anything to compare it to. Then we moved to north California when I was 12 and the sun came out. Dad moved us to a somewhat remote place, at least up at the end of a valley road, where I learned that love of the land is not just a romantic idea for western novels but a real thing. I want to talk about that more in a while. It’s already on my Blogspot. Then I got trapped up here again and been trying to escape ever since. There is a way out of the murky muck without leaving the comfortable RCW– it’s called Eastern Washington.

    About me. Hm. Well, I’m decently smart if I pay attention, which isn’t always. I have a variety of interests to keep me amused. If a few people like me, that’s enough.

    Internet publishing caught my attention from early on, when ISPs came with hosting and everyone had a yourhost.com/~you. My diary and photos of my children went up instantly.

    The Barbie patterns came later. I had to invent a pattern for my daughters’ 1999 new body Barbies, so I thought I might as well share it. When I discovered the idea of page stats and looked at mine, I was surprised. I guess I wasn’t the only one who needed such a thing.

    Check out my personal blog that’s been around forever, at https://janelwashere.blogspot.com/

    Other current misc in WP format, for reasons. https://playground.janelwashere.com/

    Here’s me current as of recently, in a dress made from a sheet and having not had a bath for some time, since this is our cold new home and there’s no water but what we haul in.

    Middle aged white female with glasses and a white dress, standing in the woods with sunshine behind.

    Howzat for a big old Cheshire cat. Just happy to be home. I’ve wanted a home for a really long time, and now I have a home and a lovely, nice husband, too!

  • Spirographs in Ivy Draw

    Spirographs in Ivy Draw

    But can it make Spirographs?

    Yes, it can! Only basic ones, not fancy designs like Illustrator, but they’re pretty and they’re easy and fun. They scratch my Spirograph itch.

    Here’s a basic oval that was Selection – Duplicated, then the copies rotated. It really only takes moments once you’re used to how Ivy Draw operates.

    Common factors of 360 are 6, 8, 9, 10, 12, 15, 18, 20, 24, 30, 36, 40, 45, 60. There you go. Math!

    For the red shape I made copies at 30, 60, 90, 120, 150.

    After that, the shape can be duplicated and modified.

    Let’s have some fun the Ivy Draw way. This isn’t strictly hypotrochoid line art any more. Call em mandalas, decorative wheels, rosettes, whatever.

    The rounded-corners square found in Shapes makes a cool outer ring, duplicated several times.

    Check under the flag shape for a huge library of unique icons to play with.

    There’s how to make a shape constrained to the original proportions (the arrow).

  • Enlarge Patterns Without a Printer: Inch Square Grid Method

    Enlarge Patterns Without a Printer: Inch Square Grid Method

    If you need to transfer sewing patterns or other patterns from pdf document to paper without a printer, here’s one method using Ivy Draw.

    Craft magazines used to come with miniature patterns on a grid to be enlarged onto graph paper. Nowadays it’s rare because of printers. But sometimes you don’t have a printer.

    Ivy Draw makes it easy to overlay a grid onto a pdf pattern page so you can copy patterns the same way.

    You need a pdf viewer that has a black background so you can see the edges of the pages. View the pattern page and take a screenshot. I used the Kindle app. The sides don’t show, but I can see where the top and bottom of the page is and that’s enough to get it the right size.

    Here’s a view of my screen viewing a pattern piece in the Kindle app. Any pdf viewer would work as long as you can set the background to a contrasting color.

    Make a document in Ivy Draw of 8.5 x 11 inches (or whatever the pdf page dimensions were). Paste the screenshot into it via Ivy Draw’s Drawing Menu – Images.

    Make sure the Grid is showing and aligned to top left. (I randomly switched to making the screencaps on my phone instead of my tablet, sorry, don’t be distracted by the change in size.)

    Then zoom out a bit and resize the screenshot by hand until the page image and your 8.5 x 11″ grid match up. The second image is me nudging the corner until it’s as closely aligned as I can get it. This isn’t a completely exact method but better than tracing the image off your tablet screen, or some of the other printerless methods I’ve come across. I have enough feeling of confidence in this method to cut fabric based on it.

    Then get some graph paper with 1″ lines, or use a ruler to make lines on paper, and visually transfer the pattern across.

  • Ivy Draw – Vector Graphics Editor for Android

    Ivy Draw – Vector Graphics Editor for Android

    Loving this app! Absolute genius and SO affordable. It fills in the gap when I need to get something done and I’m not near Illustrator.

    I couldn’t find much in the way of a manual or tutorials, so here I’m compiling my own guide page as I figure things out. Have patience with a work in progress and send me your suggestions, please.

    When I first went shopping for a vector graphics editor for Android, it was pretty easy to narrow down to Ivy Draw and Vector Ink. Vector Ink had so many powerful capabilities that it was close to being an Illustrator replacement, but Ivy Draw was simply more fun. I found myself wanting to play with it. At only six bucks each I figured I might as well get them both, Vector Ink to get work done and Ivy Draw just because I like it.

    Vector Ink can do some amazing things when it’s working, but unfortunately, all those complaints about it being buggy and unstable were right. It’s so fiddly that I got frustrated. There’s a wealth of tutorials for it and I started trying to follow along– “trying” because you have to hold your mouth just right and then maybe sometimes it works like the instructions. Then the program forgot I had paid for it and reverted back to the limited version. It wouldn’t even load my previous artwork. I complained to the developer. No answer. I tried to get a refund from the Google Play store but they said no, which surprised me– no refund even though I had paid for nothing? I complained to the developer again. Still no reply. My credit card took back the six bucks so that’s that. Several days later the developer replied to say that the program only works when you’re online and logged in. Well, that wouldn’t have worked for me anyway since I’m about to move out where there’s no internet.

    I was kinda glad to be left with Ivy Draw. I just like it. There are things it doesn’t do, but the things it does it does competently, in a stable, non-frustrating fashion. It’s very easy to use after an initial learning curve. Now that I’m in the groove and a fan, I’m figuring out ways to make it work and it’s part of my toolbox now. Between this and the fabulous free IbisPaint (which is amply covered by instructions and tutorials already) I can get things done.

    Don’t know what’s up with the dev for Ivy Draw. I hope he’s okay. I hope the program continues to be available. But he doesn’t answer emails so I guess we’re on our own.

    I began this instructional page for myself, to write down all the tool names from the tooltips so that when I forget where something is I’d have a listing to go back and search for it.

    This sign ** is to mark where there’s something I still have a question about.

    Various Tips

    Moving Around the Screen

    Use one finger to move a selected object. Use two fingers to move the screen around or to zoom in and out.

    Tooltips

    Long-touching a tool with your finger brings up a floating tooltip to let you know what tool it is. I’ve written down a bunch of these below for reference.

    Where’s the Okay button?

    Sometimes the dialog box doesn’t have enough space to show the Okay button, but it’s there at the bottom. Scroll down a little.

    How to quit a drawing and start a new one

    Save your drawing using the Drawing Menu (see next screenshot). To get back to the Splash / New Drawing screen, tap the “back” button on your device.

    How to open a drawing

    Return to the Ivy Draw opening screen by hitting the Back button on your device to find the Load Drawing option.

    This image has an empty alt attribute; its file name is Ivy-Draw-c-1024x640.jpg

    Screen Overview / Toolbox

    Ivy Draw workspace with labels

    Layers Panel

    Layer menu
    Top row: Open / close Layer Panel – Toggle Panel Transparency – New Layer – Hide All Layers – Show All Layers
    Layer Transparency Slider
    List of layers, with an eye for Show / Hide
    Bottom row: Drag to Adjust Panel Height – Move Layer Up – Move Layer Down – Change Selected Object’s Layer – Layer Menu (Duplicate – Rename – Group All – Merge Down – Delete – Identify)

    To move an object to a different layer

    Select the object then tap the 4th button at bottom of the Layers panel, with two layers inside a dotted square. Then tap the layer where you would like the object to go.

    The Identify option is for finding artwork. Select a layer and hit Identify and the artwork flashes to show its location even if it was hidden. Pretty cool.

    ** Is there a way to find out which layer an object is on? Sometimes I want to select an object that I can see, but first I would have to know and select which layer it’s on.

    Grid Options Panel

    The Grid Options panel seems pretty self-explanatory.

    ** One thing I don’t know yet is what Show Divisions does and how to use it. Would it be like a grid between every 5th line like on printed graph paper? That would be great! I’m going to ask the developer pretty soon here along with some other questions.

    Selection Tool

    Overview of the Selection Tool screen.

    Selection Tool menu:
    Locking Options – Move – Resize – Rotate – Trash – Duplicate (Copy and Paste) – Quick Edit
    At the top with Selection Tool menu:
    Multi-Selection Mode – Modify Selection – Selection Menu (Select All – Invert – by Fill / Stroke) – Arrange (bring to front, bring forwards, send to back, send backwards – horizontal flip – vertical flip) – Align (left, vertically, right, top, horizontally, bottom)
    On the side with Selection Tool menu – Resize Mode: Grow from Centre / Center – Lock Aspect Ratio
    On the side with Selection Tool menu – Rotation Tool: Drag selection box to move object – Rotation anchors

    Multi-selection mode

    If that box is highlighted “on” then you can pull the selection arrow around on the screen to select things, and the Modify Selection menu determines whether you can add to, take away from or replace the selection. In Ivy Draw you must drag the selection box all the way around an object, not just touch the edge of it.

    Copying and Pasting, Kinda

    It’s the Duplicate button. There isn’t a way, that I’m aware of, to copy something and paste it later, as if to a clipboard. But you can select an object and hit Duplicate (it looks like nothing happened, but it pasted the copy right on top) then pull the copy off to the side.

    There are two ways to Rotate

    One way is to click the Rotation tool and do it freehand. The other is to select the object with the Selection tool, then tap the Quick Edit Toolbar (the screwdriver and wrench) then Object Properties (same screwdriver and wrench icon on the row above) and enter a precise number into the Rotation box.

    Shape Tool

    Shape Tool menu:
    Choose shape – Fill – Stroke – Special Effects – Object Properties – Deselect (Enter / Okay / Confirm) – Convert to Editable Path
    On the side with Shape Tool menu: Toggle Stamp Tool – Stamp Tool Settings – Grow from Centre / Center – Aspect Ratio

    Stamp Tool Settings

    The Stamp Tool makes confetti across the screen:

    ** What’s that top slider? It makes an orange box, that I don’t know what it does yet. We’ll have to figure that out.

    Text Tool

    Wasn’t that clever the way I did text on an angle for my screen overview? It was waaay less easy than in Illustrator, but we need to stop comparing with Illustrator right now. Illustrator doesn’t run on tablets and doesn’t cost six bucks.
    I made that text using spaces, then went to Selection – Rotate and turned the whole object 45 degrees.

    Text Tool menu:
    Choose Text – Fill – Stroke – Special Effect – Object Properties – Deselect
    On the side with Text Tool menu: Toggle Stamp Tool – Stamp Tool Settings – Grow from Centre / Center – Aspect Ratio

    Stamp Tool

    See just above, with the blue flowers– this does the same thing except makes confetti out of text!

    Editing text

    For a while I couldn’t figure out how to select and edit text again after it had been entered. It is possible! Start not with the Text tool, but the Selection arrow. Select the text THEN click the Text tool, then the capital T (tooltip calls it “Choose Text”).

    Text can even be cut, copied and pasted from another source.

    Path Tool

    Here’s the Pen and Path tools, the real vector shape editing, the fun stuff!

    Path Tool menu overview

    Path Tool menu:
    Path mode – Path settings – Fill – Stroke – Special Effect – Object properties – Deselect (Okay, Confirm)
    Path Mode submenu: Straight Line – Quadratic Curve – Cubic Curve – Freehand – Pen Tool – Move Points – Edit Mode
    Path settings dialog: Dotted / dashed line

    YES, Ivy Draw can join an existing line with the Pen tool

    People were complaining in reviews because it can’t, and at first I thought they were right.

    Make a line, then select the line, tap Path Tool, then Path Mode – Pen Tool and tap one of the large ends of the shape. It joins!

    Editing nodes

    In Edit Mode you get the following menu. I’ve been having a lot of fun with it.

    You can run along the nodes and Toggle Control Points. Also that first small, solid round dot, Switch Focus Between Nodes and Edges, gives you the path between the nodes to play with.

    Adding a node to a path

    Under Path Tool – Edit Mode, use the “Switch Focus” dot on the right to focus on the line between the two points, then tap “Divide in Two”. This adds a new node in the middle of the line. I’m not sure if that’s the right way to do it, but “If it’s stupid but works, it isn’t stupid.”

    Removing a node from a path

    Select the node and tap the garbage can 🙂

    Drawing Menu

    Drawing Menu:
    Share Image (PNG or JPG) – Export SVG – Save – Save As – Grid Options (same as box in upper right corner) – Images (import picture into the drawing) – Display Options (background color) – View Actual Size – View Page – Hide Interface – Page Size (document layout) – Page Background

    Export artwork as PNG or JPG

    To export as JPG we go to the Drawing menu and choose the first option, Share. I tried various things and got various results, but exporting to a third party file manager, File Manager Plus, saved nicely as a jpg. Emailing it to yourself works too.

    I’ve exported reasonably huge jpgs without any problems.

    Projects / Applications

    My uses are all about crafts 🙂

    Stroke Dashes to illustrate embroidery ideas

    I’m happy making some shapes with the Shape tool or the Pen tool, then change the Stroke style to dashed line. It looks enough like embroidery stitch to help me visualize my design before working it. See the Stroke Dashes dropdown box? Next to it is a gear where you’ll find more fine tuning for how the dash pattern looks.

    After setting the dash pattern you can drag the object’s resize handles to make the dashes line up most pleasantly.

    Here’s a way to transfer printable sewing patterns without a printer

    Designing colorful cross stitch or needlepoint pattern grids

    Coming next!

    But can it make Spirographs?

  • Jumper Dress Pattern for Women

    Jumper Dress Pattern for Women

    It’s about as simple, basic and easy as a sewing pattern can get. Free pdf to print at home.

    Free pinafore dress pattern with modest neckline and long armholes. Adult woman/misses size.

    This is a multi-size pattern I made up several years ago. Nowadays I think I made the sizing more generous than it needs to be and the results are too loose. I’d say the pattern is fine, just ignore the sizes marked on it, and decide how large you want the jumper to be then choose the appropriate piece according to the measurement, remembering to allow for seams.

    The original pattern finished garment measures from 39″ to 48″ at the waist. That would fit waists of maybe 33″ up to 42″.

    Original jumper pattern (note the newer version is below)

    And this is the skirt pattern I used. It has a bit of shape and hangs nicer than just gathering a square.

    In the picture, I’m 38-30-42, and I cut a size 38″ for myself. I cut the skirt shape on the 12″ cutting line for minimal gathering and maxi length. For a larger size one would need the 14″ cutting line at least.

    Cut four skirt pieces, or two on the fold adding corners.

    Instructions

    Sew the backs and fronts together at the shoulder seams, then line them up like this,

    Sew the armholes and neckline, press, clip the curves and then pull the back pieces through at the shoulders.

    Sew up the back seam right sides together. (Up one side, over the top, and down the other side)

    The skirt piece can be cut in four pieces, or cut two on the fold and then add corners.

    At that point it’s traditional to sew the side seams, then gather the skirt and attach.

    On this one I tried being different. I gathered the skirt front and back pieces separately, sewed them to the front and back of the bodice, then sewed up the side seams last. That way I had to hand-stitch the bodice lining later, which is not without pains of its own. It might be easier the traditional way.

    New model for 2021

    Then recently I made up a new jumper pattern for myself that I’m going to share also. I wanted a jumper that was more close fitting. Six inches ease at the waist is enough, I have a 30″ waist and most of my dresses are 18″ when spread out flat.

    I was going for a pioneer apron look with the even longer armholes. I didn’t want any seams or shaping in front, but some shaping is good so I took it out of the back. I don’t know if that’s a standard way but I like how it turned out.

    Here is that file in pdf for printing.

    My two next plans for it are to make a real apron by cutting the back pieces inward a bit and adding ties. I’m also going to do a spiral seams version, like this. That’s in the testing stage right now.

    I also made myself a fake fur cave chick outfit in preparation for my cold new home.

    It was cut roughly with this pattern but a lot larger because the fabric is so thick. What you can’t see is that it’s lined with another layer of fleece. Almost medieval, isn’t it?

    Here’s one I made by cutting the denim top shape and the panels straight down then adding some triangle godets as needed. (Cut straight down front and back – sew the side seams just under the armpits – try it on – there will be triangular gaps. Visualize those gaps and cut pieces of fabric that shape – stitch em in there – if more fullness needed, add a back seam with another godet)

  • Diamond Granny Crochet Motif

    Diamond Granny Crochet Motif

    I was having a granny square thing for a while and churned out a bunch of scrapghans. But what about a granny crochet diamond?

    I can’t remember what got me on the idea of a diamond shape, which is sad, because usually the long-winded story of the whole course of the inspiration and development is half the fun! (At least for me. On other people’s sites I’m usually like, “Come on, I don’t care how you came up with it, just get to the recipe.”)

    But yeah. Granny diamond.

    I thought it would be simple, but it wasn’t. I put a bunch of small balls of scrap yarn in the vehicle so I could struggle with this idea on long road trips, but every attempt ended up going wrong. Either the end points got too elongated or the sides puffed up and became rounded.

    The internet had some cute patterns, but not exactly what I had in mind. I wanted it to be a REAL granny with groups of 3dc, and to only use double crochet, not throw in treble or half double for shaping. It also has to be super easy to remember, since I’m usually crocheting for yarn therapy.

    Then two things clicked. It’s simple math. Square means there’s the same angle at all four corners, in total. A granny square increases by three dc at each corner, so, to make a diamond, some of the increases should be moved from the sides to the points. Instead of three on each corner, it should be two, four, two, four.

    Also, if I want the shape to have straight sides, then I should start with the straight sides, so I made the second and third rows on a magic ring. It’s easy to go back later and fill in the foundation.

    Also, if you’re curious, here is what happens if you make a regular granny square with the only difference being two chain, four chain, two chain, four chain at the corners. It does come out slightly diamondy.

    Then suddenly one of my attempts looked right, and I found myself staring at a diamond shape.

    BUT– funny thing is, it came together with a TWO dc group pattern. I don’t know why I compromised so far as to try two, when I had been so determined on three. I guess any “granny” was better than failure and the math was easier with groups of two.

    Also, that’s more than double the increases at the points, but I really like the sharp pointed, extremely diamond shape.

    But I wasn’t all that happy with the large holes. I contemplated such level of compromise as to knuckle under and fill them in with a triple crochet– but no! There must be another way!

    Filling in and tying that point together using a dc. Perfect.

    Here’s the chart written out.

    After that WIN I was getting better, and produced a “real granny” with three dc groups.

    There’s the diagram if you’d like.

    Funny thing is, I actually like the one with 2dc groups better. It’s more elongated, more sharp and diamondy. If it was to be contrasting colors and tiled, I think it’d make a cool dramatic harlequin pattern.

    Here’s the design tool I’m using. I looked at a lot of editing apps for my android tablet and eventually settled on this. It runs on a tablet, hehe. There’s a pencil that works just like the usual pencil tool. I haven’t used one of these for a long time but it’s surprisingly intuitive. The eraser add-on is very handy!

  • Six Petal Flower Crochet Motif

    Six Petal Flower Crochet Motif

    Amazing! From my imagination to a motiv that was exactly what I had in mind, on the first try. That’s not usually how it goes.

    I’ll have a try at writing the pattern. If you see any errors let me know.

    1. With center color, ch4, join with sl st
    2. In the ring, ch3, sc, (ch1, 2dc) five times, join with sl st
    3. Sl st in dc, sl st in ch1, (ch7, 3dc in 4th chain from hook, 1dc in each of next 2 chains, sl st in chain) repeat around
    4. With petal color, (dc in sl st, dc in 3rd chain, ch1, dc in next chain, ch1, in 3ch loop (dc, ch, dc, ch, dc, ch, dc, ch, dc) ch1, skip 1 dc, dc in next dc, ch1, dc in next dc) repeat around 6x, join with sl st

  • Update Nov 2021

    Update Nov 2021

    Here’s the latest tidying of my website! I wanted it to be completely on WordPress since I’m about to move off grid and need to be able to make all my changes online.

    Wait, does that sound backwards?

    I’m going where there’s no power, so I won’t be able to run Dreamweaver on my desktop any more, but sometimes I’ll be in range of a cell tower or I can use the computer at the library.

    Of course I tore the site apart in my usual enthusiastic fashion which is a pretty clean shred. I think by now it’s all back together more or less the way it should be. If you find broken links, missing images or any similar delights, let me know.

    I love WordPress! I was having issues with the block editor when they first came out with it, but by now all the kinks are smoothed out and it’s very easy and convenient. What a cool thing to be able to edit pages right there on my phone! That way I can make barely-considered changes while lying in bed almost asleep.

    Edit Mar 2025. Adding a picture for post grid purposes. By now I have solar power and ChatGPT is a thing. Love that nice stiff parchment she’s writing on, eh? And that climbing rose has a looooong stem. Well, it’s pretty, that’s what matters!

  • Princess Dress Pattern for Curvy Barbie

    Princess Dress Pattern for Curvy Barbie

    I love Miss Blue’s beautiful space princess hair.

    Of course my first dress for her had to be a princess seams sundress. Princess seams are not a very easy design to create. I set out to do a strapless at first, but it didn’t happen and this did.

    Might be because I can identify with this lady, and this is the style that looks best on me.

    Just last week I couldn’t resist buying Fashionistas #63 too. She’s so very platinum that it almost looks grey, and I can imagine she’s just a very young-looking granny.

    Here she is in one of the test models of this pattern.

    And here is the pdf file to print Barbie Curvy Princess Pattern <– CLICK HERE TO DOWNLOAD

    INSTRUCTIONS


    Pattern includes 1/4” seams except at the neckline and armhole, there’s only 1/8” seams there.

    NOTE that your presser foot is probably wider than 1/4″. Don’t line up the fabric with the edge of the presser foot or the dress will come out too small. I drew a black mark on my machine so I know where a quarter inch really is.

    Place pattern on fold, cut one large shape for the dress and a shorter one for the facing. Cut through the fold in the back.

    Lay the facing and dress right sides together, stitch armholes and necklines with narrow seams. You have to be very careful and precise about this step. Flip over to be sure the seams are even.

    Then clip the curves.

    The next part is tricky but doable. To pull the back through the shoulders you’ll need a long tweezer or forceps.

    Reach through the shoulder, get the bottom corner of the back and pull through. Keep the bulk smooth. If it bunches up and you pull hard, it’ll rip those tiny seams.

    After the back section is through, gently ease the facing through.

    Stitch up the darts on the dress and facing. (That could have been done as the first step but it’s easier to have the whole thing lying flat while dealing with the shoulders.)

    After the darts, put facings right side to right side and sew down sides of facing, then continue, with the dress pieces rights side together, sew down the side seams as well.

    Tack the facing to the dress at the side seams.

    Fold the backs over, once as narrowly as possible then a little wider. Doesn’t hurt to try it on the doll at this point.

    That’s a cute length for a mini-dress and looks flattering on this body type.

    Unfortunately I’m allergic to curved hems, so I added a 13 x 3″ ruffle.

    And velcro. All done!

    A line of Velcro makes it easy for a young child to dress, or you can stitch the skirt up to the point marked on the pattern.

  • Make Charted Needlework Graphs in Adobe Illustrator CS5 using Live Paint

    Make Charted Needlework Graphs in Adobe Illustrator CS5 using Live Paint


    The goal was to make a square chart for cross-stitch or needlepoint by tracing a background image onto a grid. I found various methods to make the chart, but nothing about how to color it other than resorting to something like bitmap painting with the fill tool.
    There are plenty of ways to automatically digitize a color picture into a charted design, but I wanted to be able to the colors for individual squares using my judgment about which squares should be which color.
    Adobe Illustrator has a way!

    The book cover I wanted to stitch with plastic canvas is 57×37 squares, so I need 58×38 lines.
    I decided to use 10 squares per inch because that’s easiest.

    So the vertical lines are going to be 3.8″ long.

    To do this, set the Stroke for 1 pt and create one line on the left side of the work area.

    Then create a copy .1″ to the right.

    Using the Move tool, click COPY. Now there are two lines.
    Then hit Ctrl+D (Transform Again) while counting out until there is the correct number of lines. 58 lines only takes a couple moments.

    Then select every tenth line using Shift + click. It’s easy if you line the whole group up with the 1″ mark on the ruler and zoom in.
    Change the stroke of those lines to 2 pt.

    Now the horizontal lines. Same deal. Easier if you create them off to the side a bit, for the later selecting of every 10th one.

    After that, scoot the second set to line up with the first. Voila! Graph paper in sections of 10!

    Then take the artwork to be graphed and put it behind the graph.

    I’m doing a simple two color sailboat from a logo from my farming game.


    I pasted the sailboat behind the grid then scooted it to be most naturally advantageous for stitching, with the mast filling two columns and the bottom of the boat filling up one row of squares.

    Once it’s in the right place, lock the image so it can’t be selected or moved.
    Select the whole grid above it and do Live Paint – Make
    Then find the Live Paint bucket tool or hit K

    Zoom in and start coloring individual squares. This is the tracing part, like in the old days when we used to trace designs using two sheets of paper held up against a window.

    In progress…


    You can click and drag the Live Paint bucket which saves some time.


    Honestly that’s as far as I’m going to take this one. It’s clear enough to print as a reference chart for stitching like I wanted. The beautiful finished piece is the needlework, not the chart!