Tag: featured

  • Barbie One Size Fits All Sewing Patterns

    Barbie One Size Fits All Sewing Patterns

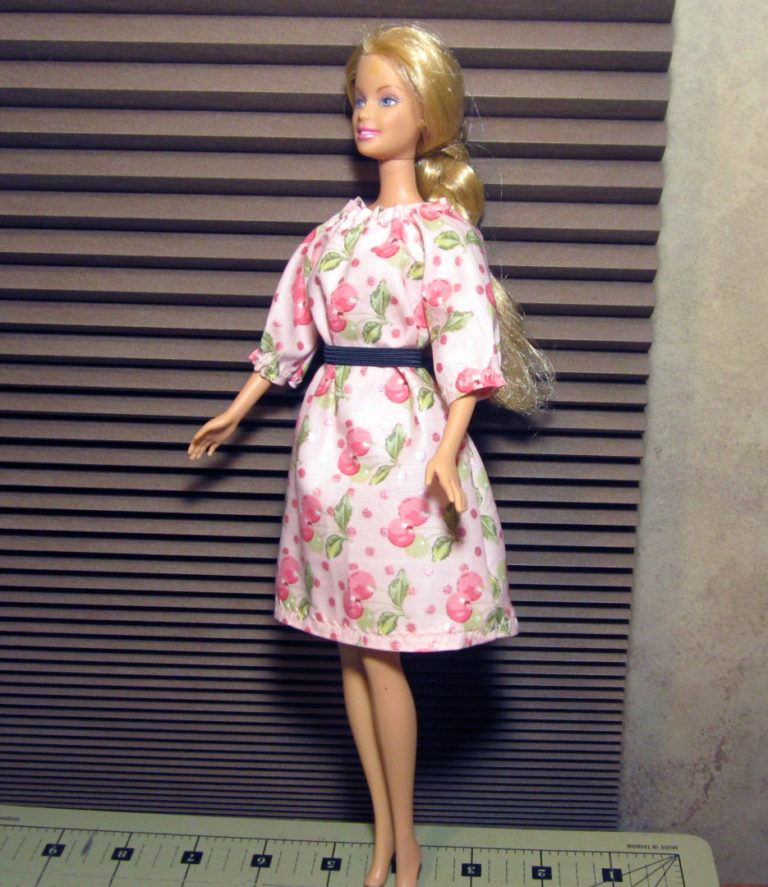
    I see a real need for this. It’s a simple, easy dress to fit any Barbie shape. We have a pile of naked Barbies! They need clothes quick, and they should be able to share. Let’s go.

    Here’s a pull-on shift dress, about as basic as it can be. The other is a basic peasant dress with Velcro closure. Both have only one pattern piece.

    I’ve tested with Bellybutton, Original/Vintage and Curvy. I don’t own a Disney Princesses doll to test. Curvy and Lammily are similar dimensions, and the shift pulls on over Curvy’s hips exactly right, so I bet it would fit Lammily, and the peasant dress definitely would. I’m confident it would fit Fashionistas Tall and Petite. I also have a 10″ slim fashion model doll called Zuru Glitzees Princess with a tiny 2.5″ waist. It’s a bit generous on her but fits well enough that it’s acceptable to play with, and that’s the point: sharing, and playing dress up together.

    NOTE scroll down for Swing Dress too!

    The shift dress doesn’t even need any fastener. It takes literally a few minutes to make on a sewing machine.

    It can be a gown if you use shiny fabric, or it can be playful in a print. It’s a blank canvas for your decoration. Try patchwork, lace, whatever.

    I’m actually excited about this.

    I mean, I understand that the 1966 Barbie shape needed an update. The 1999 Bellybutton Barbie was a good solution. There were no patterns for the new shape at first, so I made one up and shared it. Then Simplicity came out with a couple paid ones that were extremely cute. Okay, now there’s a new shape and there are patterns. I would have called that done.

    But they just couldn’t leave well enough alone, and now there’s a crazy variety of body shapes and sizes, all called Barbie, so that, like a bird watcher, you need a field guide with a flowchart to help you figure out which species any particular girl is. That’s kinda nuts.

    I’ve had some troubles that kept me busy for a while, and my also, baby girls grew up. But I’ve liked sewing for dolls since I was little. When I had a moment, I came back and looked at the internet to see if there were any spaces that needed a contribution from me. It didn’t seem so. All those new bodies have been covered (haha) with tons of patterns.

    The one thing that hasn’t been done is to sweep all that aside and offer a solution to this nonsense: ONE dress to conceal the nakedness of any approximately-Barbie.

    I don’t think adult hobbyists will be interested in this. Grown ups who sew doll clothes for art’s sake probably have money and time for beautiful, complex patterns. I enjoy admiring their masterpieces, but what I’d like to do is help out the moms and grandmas who need something simple and quick that can expected to fit their “11.5 inch fashion doll”.

    Can there really be a cute dress from just one pattern piece to fit any doll? Well, here it is. Not once but twice. So that’s my contribution and I’m happy again.

    I’m looking forward to making more models and more designs. I’d like to turn the halter dress into a OSFA too.

    But I am in such a rush right now! Life’s moving, we’re moving. We have difficult but possible challenges that we must rise to meet. I’ve gotten this project this far by thinking about it before falling asleep, then working on it in snatches of stolen time when I should be doing real life stuff.

    Let me know if you have suggestions.

    I want to do something like this for the 28″ dolls too, Barbie, Curvy, and Descendants. I already have a peasant top for 28″, it just needs a wider skirt and there we go. I haven’t made anything for 28″ Curvy Barbie yet! She’s been lying in a dresser drawer for a year. Must sew. Possibly… summer 2023? Or when I get snowed in, winter 2023 which I’m looking forward to 🙂

    The Patterns are HERE

    Free printable pattern in PDF format – Barbie OSFA shift dress for all 11.5″ tall dolls.

    And here’s the pattern for Barbie OSFA peasant dress

    Instructions for Shift Dress

    Use lightweight fabric that won’t fray much. Cut the pattern piece on fold.

    Make tiny clips at the corners where indicated

    Fold over barely 1/4” at neckline and armhole edges and topstitch. (“Barely” means “almost 1/4″ but not quite, and definitely not as wide as half your presser foot”)

    Sew side seams together, up to the clip

    Add a bottom ruffle at this point if you’re doing one.

    Sew up back seam to the clip

    Hem the bottom.

    Instructions for Peasant Dress

    Cut one pattern piece on fold of fabric.

    Make tiny clips at corners where indicated

    Fold over neckline and sleeves shy 1/4“ (almost 1/4″ but err towards the narrow side) and zigzag over a piece of cord, then pull up to the measurements given (printed on the pattern for your convenience if hand sewing while travelling) – sleeve edges 2.5 inches and neck to 5 inches.

    Sew side seams.

    Fold over back edges to finish, then add velcro.

    Narrow hem or a ruffle – in the picture I used a piece 2” x 16”

    2024 – Swing dress fits ALL

    It’s a lil bit wider around the armpits, more graceful around the sleeves and shoulders, and absolutely FITS (definition of fits – easily goes on) 13″ First Barbie, 12″ Darci / Jem, 11.5″ all Barbies incl Curvy.

    The shift dress doesn’t fit First and Jem, but the swing dress does.

    Here’s the whole range:

    MGA Ella (Bellybutton body) in swing dress, 2006 11″ short Barbie in shift dress, 13″ First Barbie in swing dress
    Jem (Darci) in swing dress, Curvy Barbie in shift dress
    Glitzees in shift dress, MGA Ella in swing dress. That’s a hairband for a belt.
    First Barbie in swing dress, Jem (Darci) in shift dress (but it was hard to get on her), Glitzees in swing dress.

    Pattern for 2024 Swing Dress

    Swing dress, 2024, for 13″ First Barbie, 12″ Darci/Jem, 11.5″ everybody

    Just the pattern piece PDF file, make sure to print 100%, not “fit to page”

    Fold over and stitch neck and arms, then side seams, fold over back edges and use velcro

    Story to make a point

    When I was maybe nine or ten years old, a girl came to stay at the place across the road and we compared Barbie collections. Mine was fabulous compared to hers – I had busy parents, and a brother and sister 16 and 19 years older than I was who both had jobs – she had only a mother. What she had that I didn’t was a grandma. So, my collection consisted of Mattel everything, bought new. But she had one particular dress that was handmade by a grandma, from an interesting-textured Hawaiian print. It was basically a tube with a ruffle, but it was HANDSTITCHED by a GRANDMA. Envy so possessed rich little me that I was ready to give “anything” / everything necessary to swap for that, and I eventually got it, in exchange for a huge pile of store-bought gowns and accessories.

    Years later, I realized what I had done, and if there had been any way to find that girl and give that grandma-made dress back, I would have.

    The point is, that’s the value of a handstitched Barbie dress to little girls. Tailoring and “looking right” to the eyes of adults is a different thing.

    Slow Stitching

    Slow stitching is a newish, cool idea, rather to sewing what zentangle is to drawing, when the activity isn’t a need any more, only a way to soothe yourself. Basically take scraps of fabric, lace, buttons, and stitch them together with no particular purpose but joy and beauty.

    I love the relaxing quality of handling textiles, but I don’t think I can relax to the point of COMPLETELY wasting time. Stitching with NO results in mind doesn’t attract me.

    In old times, women always had their workbasket nearby, so at any slow moment they could make a little progress. When boring people are talking? Stitch. When riding in any conveyance that you’re not the actual driver / pilot? Stitch. Movies that are more about the company than the movie? Stitching away here. Or while enjoying audiobooks.

    They sell beautiful kits with coordinating pieces, or we can carve fabrics and trimmings out of all kinds of things.

    Here are a couple random images I could find with sharing allowed. If you search for “slow stitching” you’ll find the really pretty stuff.

    Crazy Quilt (ca. 1940) Edith” by National Gallery of Art/ CC0 1.0

    Crazy quilts were slow stitching projects for rich Victorian wives.

    https://www.flickr.com/photos/lovefibre/2258569576

    Anyhoo. I have a vision for slow stitching and Barbie clothes. Once this pattern is at the place where I trust it, I find it VERY relaxing to stitch the whole thing by hand. It’s actually easier by hand, and works out faster in that more models tend to get done sooner than if you’re waiting for time to sit down in front of the sewing machine.

    There were a few blissful days this summer when I needed to stand by to help Darling with his construction project. There’s me stitching in the shade on a hot day, and a dress I’m pretty sure would not have been gottn around to being made otherwise. Good times.

    Just ONE pattern piece is great for portable sewing. No little pieces to lose!

    (Crochet has always been the same thing. Only imagine if they made a crochet machine, but sometimes we choose not to use it.)

  • My First Barbie 13.5″ Free Printable Sewing Pattern

    My First Barbie 13.5″ Free Printable Sewing Pattern

    Oh guys, it’s been a journey, I must say. More about that later. At the moment I’m *grateful* that I still have technology enough to produce a reasonably decent printable pattern. We have moved off grid, kind of feels like we fell off the world computer-wise. I have Android and a little solar battery and it’s harder than it used to be with a lot more steps, but it’s doable. Just more challenges to overcome makes it more satisfying, right?

    So. A new “preschool” version fashion model doll, two inches larger than the usual one.

    I liked her, and must make something for her. Let’s go. We need clothes!

    Here’s what I have so far. Just a basic short, cute shift dress with dressing-up possibilities.

    It’s another one piece masterpiece, super easy. Cute stuff can be made with it, you’ll see, I’m working on a couple more models! And maybe I’ll make her a more structured, tailored, fashionable, multi-pieced, fiddly, difficult outfit later. We’ll see.

    Download the pdf, it’s letter size 8.5×11″ and print at 100% scaling. It has some instructions on it.

    I’ll add more pics here as I work on the next model. If you make something cool with it, share a photo!

    PLEASE NOTE THIS IS NOT FOR THE USUAL SIZE DOLL – only for 13.5″ tall Barbie. If you aren’t sure which doll you have, try the “One Size Fits All” dress!

    There are some instructions on the pattern.

    She also fits the one-size-fits-all pattern which is here…

  • Crochet Openwork Octagon Square Motif

    Crochet Openwork Octagon Square Motif

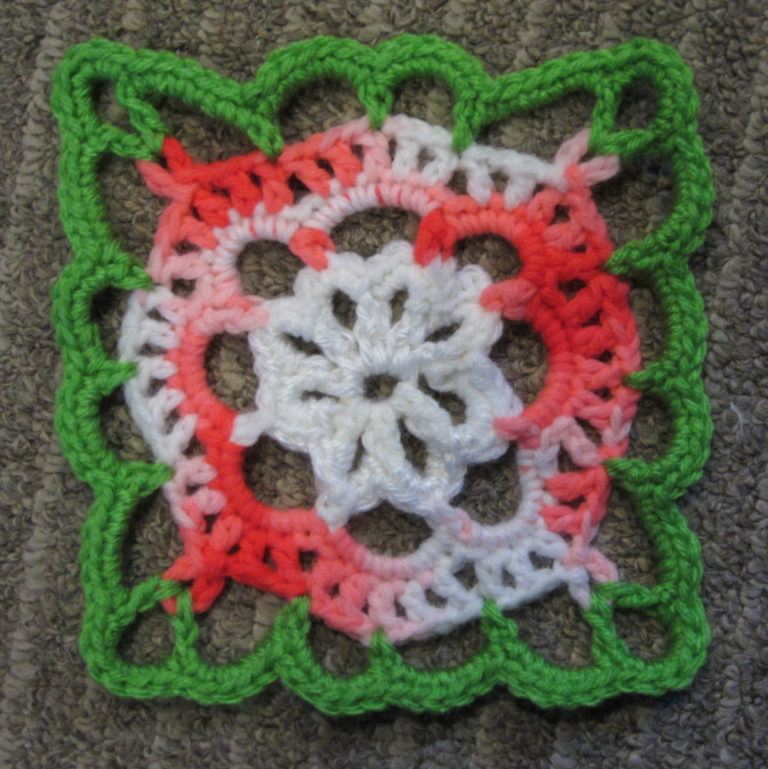
    Built from the septagon mat, but I decided to make this a separate post. I was so tickled with how the septagon design looked that I wanted to make some more using flower colors. Good luck joining seven sided motifs, so it had to turn into eight. But a square is simpler! While messing around I also changed the petals a bit to be all dcs instead of having two tcs just because I don’t like tcs, but that’s kinda random and I’m not determined on it. The previous petals were fine.

    Blue and green octagon to square openwork crochet motif

    Since I dislike those long, many-yarn-over stitches to form corners, I made four loops to dc into. I crochet mostly for relaxation. Dcs can be done without looking at them, hence are calming and the other things are not <– opinion. The only round of this design that takes any thought while working, then, is the round with the petals, as you have to remember to put corner loops on every other one. Other than that, easy to remember and brainless to stitch. If it was 1% more complex than this I probably wouldn’t do it. I do simple.

    Here we go.

    Octagon to square openwork flower crochet diagram

    Explanation of rounds:

    1. Chain five, join to form a ring.
    2. (1 sc, ch 6) into ring eight times
    3. 5 sc into each loop
    4. (1sc into center of 5sc, ch 6) around eight times
    5. 7 sc into each loop
    6. (Skip first sc, into each of next two make 1dc and 1ch, then 1dc, then a 5ch picot, with the slip stitch right into the top of that dc, then ch, dc, ch, dc, and skip last sc) around eight times
    7. (Sc into first dc, ch5, (dc, ch5, dc) into the 5ch picot, ch5, sc into first dc of next petal, ch5, sc in middle dc, ch5) repeat around four times
    8. 6sc into each of all those ch5 loops

    Did I type that out right? Let me know if you spot a mistake. I’m writing that down three days after losing interest.

    They’re so pretty! But the idea is “solved” and I’m moving right along.

    I actually thought of this (how to turn the septagon flowers into octagons in squares) before falling asleep and then lay there for an annoying hour on that edge of wondering if the idea would still be there next morning or if I should get up and write it down. Yes, I remembered it the next morning. Made these nifty little worsted-weight confections and then that’s it. Blog about em and put em away. Maybe I’ll find a great use later, maybe make a bunch in the same color pattern for a throw. Join-as-you-go would work well.

    But I’m making cold weather gear right now! Winter is coming. Not this winter; for the rest of 2022 I’m back on the rainy side again, the west of Mt Rainier where the clouds pile up. It’s been pooping big piles of snow but usually doesn’t get below 20 F here. Next winter, God willing, we’ll be out in the c-c-c-c-cold in a trailer. Must sew.

  • Crochet Openwork Septagon Counter Mat

    Crochet Openwork Septagon Counter Mat

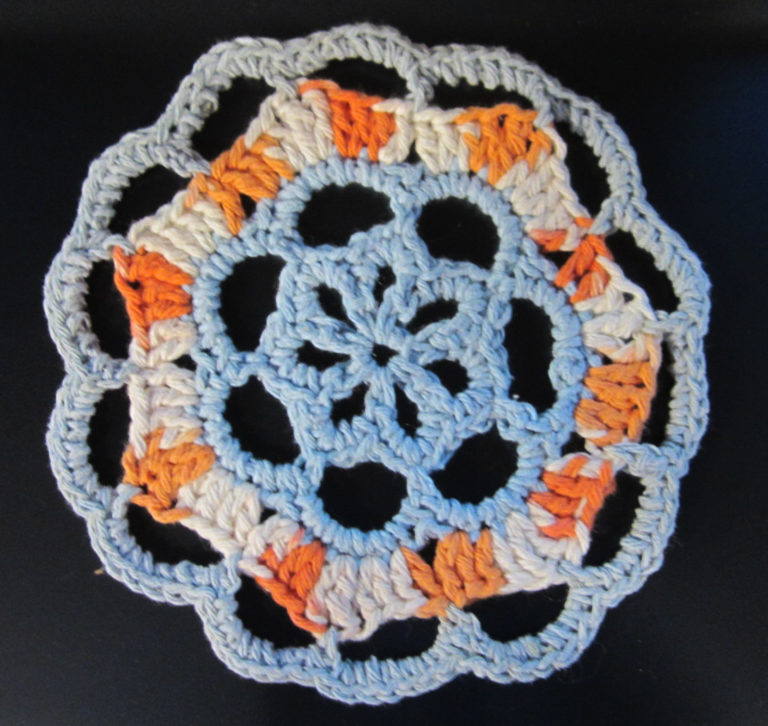
    I wanted, not a dishcloth, but a cotton round to lie on the kitchen counter for cushion under pans and things. I wanted it openwork for more ventilation.

    1)   Dig through the internet for two hours  2)  There’s nothing like that  3) Invent something.

    Not that I really cared until I started, but there aren’t many septagon doily patterns out there.  I don’t favor six points, and eight points is too many, so if I’m going to make this up by myself it might as well have seven. And I’m only going to say heptagon if the month after August is Heptember.

    I like how it worked out. Seven sides, seven scs in each loop. It’s a very perfect pattern!

    I like how it resembles a flower. If the center was yellow, the petals rose and the outside green it would look even cooler but these were the only scraps of dishcloth cotton that I had handy at the moment.

    Shorthand version of a pattern…

    (sc = don’t yarn over,  dc = yarn over once,  tc = yarn over twice)

    Round 1: Ch4 and join into a ring
    Round 2: (1sc, ch5) seven times around
    Round 3: 5sc in each loop
    Round 4: In the middle sc of the five (1sc, ch6)
    Round 5: 7sc in each loop
    Round 6: Skip 1st sc, then in the next 5scs do this – 2dc, 2dc, 2tc, 2dc, 2dc
    Round 7: 1sc in first dc, ch6, 1sc in second tc, ch6, repeat around
    Round 8: 7sc in each loop

    And here’s a diagram:

    Septagon crochet mat pattern

    Update early next morning: those three mats on the counter made me smile. They’re happy-making! 😊

    Update late next morning: I find them naturally in use. Even the phone has a coaster. Now maybe we need one more–?

  • My Homemade Hand Crank Singer 403A

    My Homemade Hand Crank Singer 403A

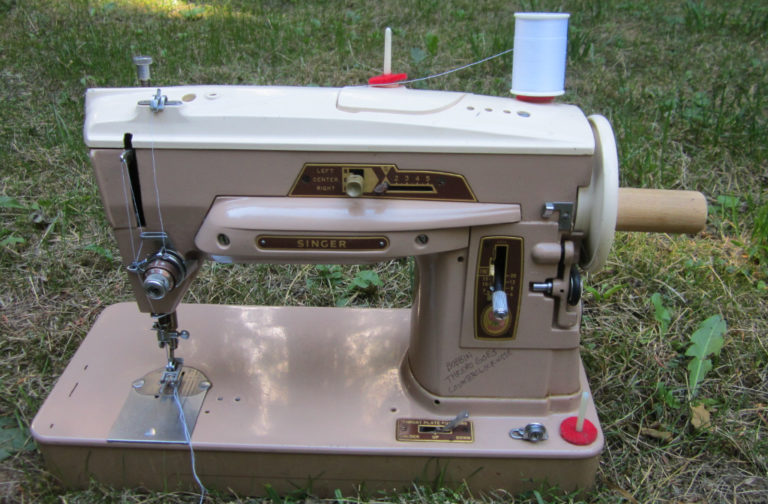
    Could it be this easy? Just add a knob to the hand wheel? I didn’t know, but the motor doesn’t work any more, so there was nothing to lose by trying. I drilled a hole in the hand wheel and attached a bit of dowel with a screw. Voila, a modern zigzag hand crank sewing machine, most useful for my small trailer where I don’t have room for a treadle base anyway.

    (Even if I still had my treadle base, which I don’t.)

    Turning the wheel around by hand is tiring, but easier than hand sewing, and slow, but faster than hand sewing.

    It worked just dandy on my most recent trip to our cold new home, where at one point I needed to hem a piece of heavy canvas. Doing it with a machine surely did save my fingers.

    “If it’s stupid but works, it isn’t stupid.”

    Very handy for sewing on the floor! No cord needed, and no presser foot. Here it’s stitching up a semi-rigid window blind.
  • Spirographs in Ivy Draw

    Spirographs in Ivy Draw

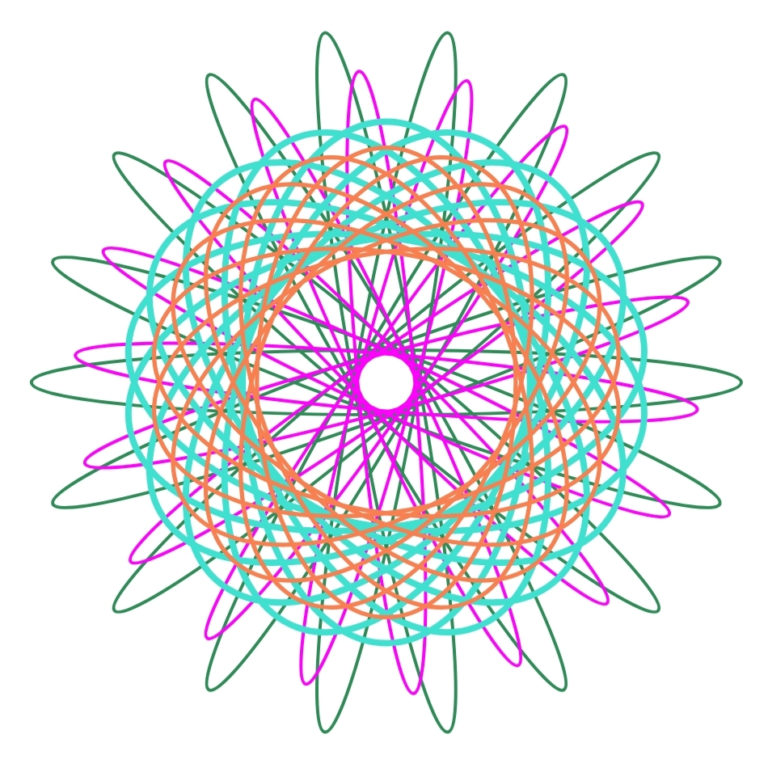
    But can it make Spirographs?

    Yes, it can! Only basic ones, not fancy designs like Illustrator, but they’re pretty and they’re easy and fun. They scratch my Spirograph itch.

    Here’s a basic oval that was Selection – Duplicated, then the copies rotated. It really only takes moments once you’re used to how Ivy Draw operates.

    Common factors of 360 are 6, 8, 9, 10, 12, 15, 18, 20, 24, 30, 36, 40, 45, 60. There you go. Math!

    For the red shape I made copies at 30, 60, 90, 120, 150.

    After that, the shape can be duplicated and modified.

    Let’s have some fun the Ivy Draw way. This isn’t strictly hypotrochoid line art any more. Call em mandalas, decorative wheels, rosettes, whatever.

    The rounded-corners square found in Shapes makes a cool outer ring, duplicated several times.

    Check under the flag shape for a huge library of unique icons to play with.

    There’s how to make a shape constrained to the original proportions (the arrow).

  • Enlarge Patterns Without a Printer: Inch Square Grid Method

    Enlarge Patterns Without a Printer: Inch Square Grid Method

    If you need to transfer sewing patterns or other patterns from pdf document to paper without a printer, here’s one method using Ivy Draw.

    Craft magazines used to come with miniature patterns on a grid to be enlarged onto graph paper. Nowadays it’s rare because of printers. But sometimes you don’t have a printer.

    Ivy Draw makes it easy to overlay a grid onto a pdf pattern page so you can copy patterns the same way.

    You need a pdf viewer that has a black background so you can see the edges of the pages. View the pattern page and take a screenshot. I used the Kindle app. The sides don’t show, but I can see where the top and bottom of the page is and that’s enough to get it the right size.

    Here’s a view of my screen viewing a pattern piece in the Kindle app. Any pdf viewer would work as long as you can set the background to a contrasting color.

    Make a document in Ivy Draw of 8.5 x 11 inches (or whatever the pdf page dimensions were). Paste the screenshot into it via Ivy Draw’s Drawing Menu – Images.

    Make sure the Grid is showing and aligned to top left. (I randomly switched to making the screencaps on my phone instead of my tablet, sorry, don’t be distracted by the change in size.)

    Then zoom out a bit and resize the screenshot by hand until the page image and your 8.5 x 11″ grid match up. The second image is me nudging the corner until it’s as closely aligned as I can get it. This isn’t a completely exact method but better than tracing the image off your tablet screen, or some of the other printerless methods I’ve come across. I have enough feeling of confidence in this method to cut fabric based on it.

    Then get some graph paper with 1″ lines, or use a ruler to make lines on paper, and visually transfer the pattern across.

  • Jumper Dress Pattern for Women

    Jumper Dress Pattern for Women

    It’s about as simple, basic and easy as a sewing pattern can get. Free pdf to print at home.

    Free pinafore dress pattern with modest neckline and long armholes. Adult woman/misses size.

    This is a multi-size pattern I made up several years ago. Nowadays I think I made the sizing more generous than it needs to be and the results are too loose. I’d say the pattern is fine, just ignore the sizes marked on it, and decide how large you want the jumper to be then choose the appropriate piece according to the measurement, remembering to allow for seams.

    The original pattern finished garment measures from 39″ to 48″ at the waist. That would fit waists of maybe 33″ up to 42″.

    Original jumper pattern (note the newer version is below)

    And this is the skirt pattern I used. It has a bit of shape and hangs nicer than just gathering a square.

    In the picture, I’m 38-30-42, and I cut a size 38″ for myself. I cut the skirt shape on the 12″ cutting line for minimal gathering and maxi length. For a larger size one would need the 14″ cutting line at least.

    Cut four skirt pieces, or two on the fold adding corners.

    Instructions

    Sew the backs and fronts together at the shoulder seams, then line them up like this,

    Sew the armholes and neckline, press, clip the curves and then pull the back pieces through at the shoulders.

    Sew up the back seam right sides together. (Up one side, over the top, and down the other side)

    The skirt piece can be cut in four pieces, or cut two on the fold and then add corners.

    At that point it’s traditional to sew the side seams, then gather the skirt and attach.

    On this one I tried being different. I gathered the skirt front and back pieces separately, sewed them to the front and back of the bodice, then sewed up the side seams last. That way I had to hand-stitch the bodice lining later, which is not without pains of its own. It might be easier the traditional way.

    New model for 2021

    Then recently I made up a new jumper pattern for myself that I’m going to share also. I wanted a jumper that was more close fitting. Six inches ease at the waist is enough, I have a 30″ waist and most of my dresses are 18″ when spread out flat.

    I was going for a pioneer apron look with the even longer armholes. I didn’t want any seams or shaping in front, but some shaping is good so I took it out of the back. I don’t know if that’s a standard way but I like how it turned out.

    Here is that file in pdf for printing.

    My two next plans for it are to make a real apron by cutting the back pieces inward a bit and adding ties. I’m also going to do a spiral seams version, like this. That’s in the testing stage right now.

    I also made myself a fake fur cave chick outfit in preparation for my cold new home.

    It was cut roughly with this pattern but a lot larger because the fabric is so thick. What you can’t see is that it’s lined with another layer of fleece. Almost medieval, isn’t it?

    Here’s one I made by cutting the denim top shape and the panels straight down then adding some triangle godets as needed. (Cut straight down front and back – sew the side seams just under the armpits – try it on – there will be triangular gaps. Visualize those gaps and cut pieces of fabric that shape – stitch em in there – if more fullness needed, add a back seam with another godet)

  • Diamond Granny Crochet Motif

    Diamond Granny Crochet Motif

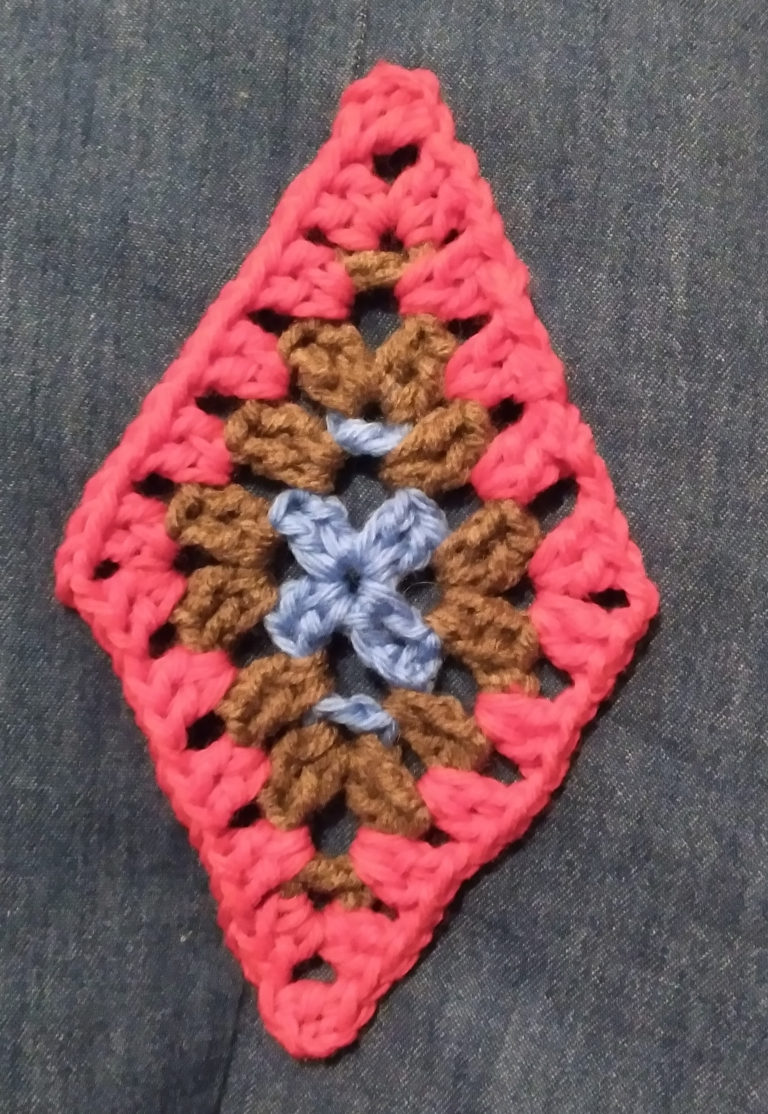
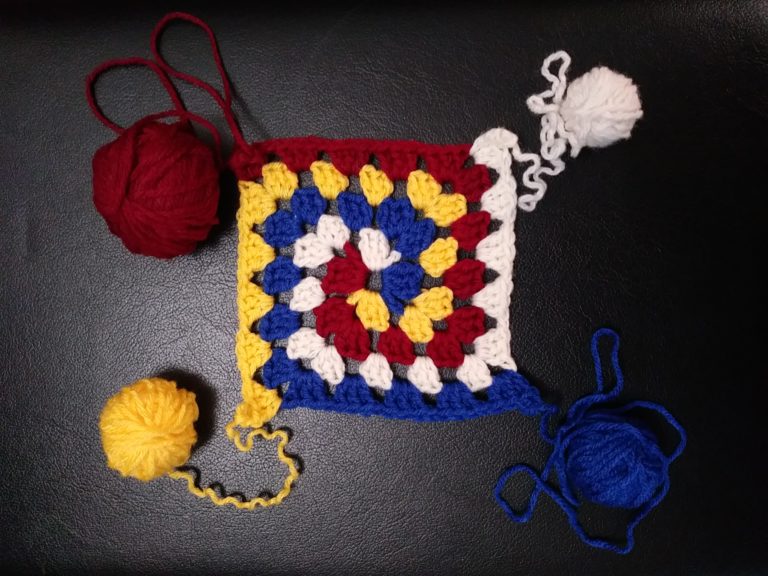
    I was having a granny square thing for a while and churned out a bunch of scrapghans. But what about a granny crochet diamond?

    I can’t remember what got me on the idea of a diamond shape, which is sad, because usually the long-winded story of the whole course of the inspiration and development is half the fun! (At least for me. On other people’s sites I’m usually like, “Come on, I don’t care how you came up with it, just get to the recipe.”)

    But yeah. Granny diamond.

    I thought it would be simple, but it wasn’t. I put a bunch of small balls of scrap yarn in the vehicle so I could struggle with this idea on long road trips, but every attempt ended up going wrong. Either the end points got too elongated or the sides puffed up and became rounded.

    The internet had some cute patterns, but not exactly what I had in mind. I wanted it to be a REAL granny with groups of 3dc, and to only use double crochet, not throw in treble or half double for shaping. It also has to be super easy to remember, since I’m usually crocheting for yarn therapy.

    Then two things clicked. It’s simple math. Square means there’s the same angle at all four corners, in total. A granny square increases by three dc at each corner, so, to make a diamond, some of the increases should be moved from the sides to the points. Instead of three on each corner, it should be two, four, two, four.

    Also, if I want the shape to have straight sides, then I should start with the straight sides, so I made the second and third rows on a magic ring. It’s easy to go back later and fill in the foundation.

    Also, if you’re curious, here is what happens if you make a regular granny square with the only difference being two chain, four chain, two chain, four chain at the corners. It does come out slightly diamondy.

    Then suddenly one of my attempts looked right, and I found myself staring at a diamond shape.

    BUT– funny thing is, it came together with a TWO dc group pattern. I don’t know why I compromised so far as to try two, when I had been so determined on three. I guess any “granny” was better than failure and the math was easier with groups of two.

    Also, that’s more than double the increases at the points, but I really like the sharp pointed, extremely diamond shape.

    But I wasn’t all that happy with the large holes. I contemplated such level of compromise as to knuckle under and fill them in with a triple crochet– but no! There must be another way!

    Filling in and tying that point together using a dc. Perfect.

    Here’s the chart written out.

    After that WIN I was getting better, and produced a “real granny” with three dc groups.

    There’s the diagram if you’d like.

    Funny thing is, I actually like the one with 2dc groups better. It’s more elongated, more sharp and diamondy. If it was to be contrasting colors and tiled, I think it’d make a cool dramatic harlequin pattern.

    Here’s the design tool I’m using. I looked at a lot of editing apps for my android tablet and eventually settled on this. It runs on a tablet, hehe. There’s a pencil that works just like the usual pencil tool. I haven’t used one of these for a long time but it’s surprisingly intuitive. The eraser add-on is very handy!

  • Six Petal Flower Crochet Motif

    Six Petal Flower Crochet Motif

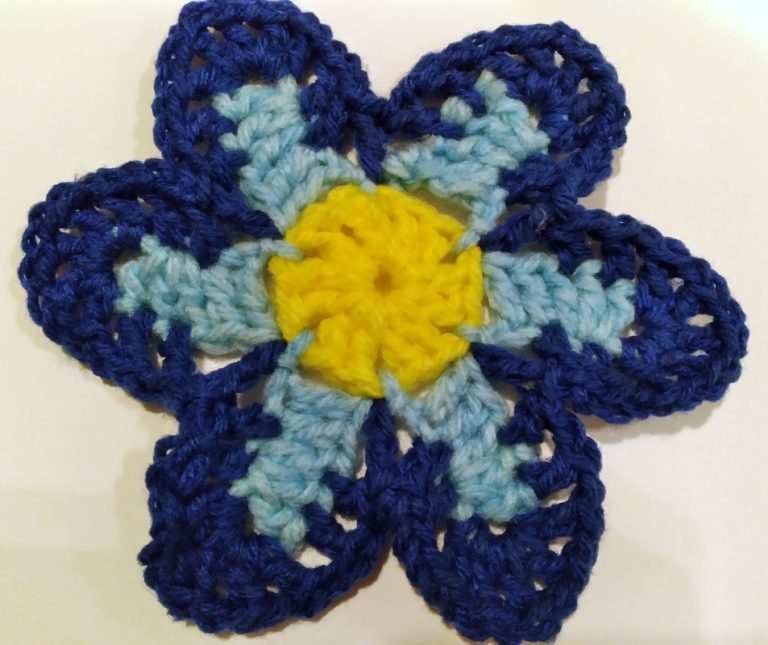
    Amazing! From my imagination to a motiv that was exactly what I had in mind, on the first try. That’s not usually how it goes.

    I’ll have a try at writing the pattern. If you see any errors let me know.

    1. With center color, ch4, join with sl st
    2. In the ring, ch3, sc, (ch1, 2dc) five times, join with sl st
    3. Sl st in dc, sl st in ch1, (ch7, 3dc in 4th chain from hook, 1dc in each of next 2 chains, sl st in chain) repeat around
    4. With petal color, (dc in sl st, dc in 3rd chain, ch1, dc in next chain, ch1, in 3ch loop (dc, ch, dc, ch, dc, ch, dc, ch, dc) ch1, skip 1 dc, dc in next dc, ch1, dc in next dc) repeat around 6x, join with sl st

  • Princess Dress Pattern for Curvy Barbie

    Princess Dress Pattern for Curvy Barbie

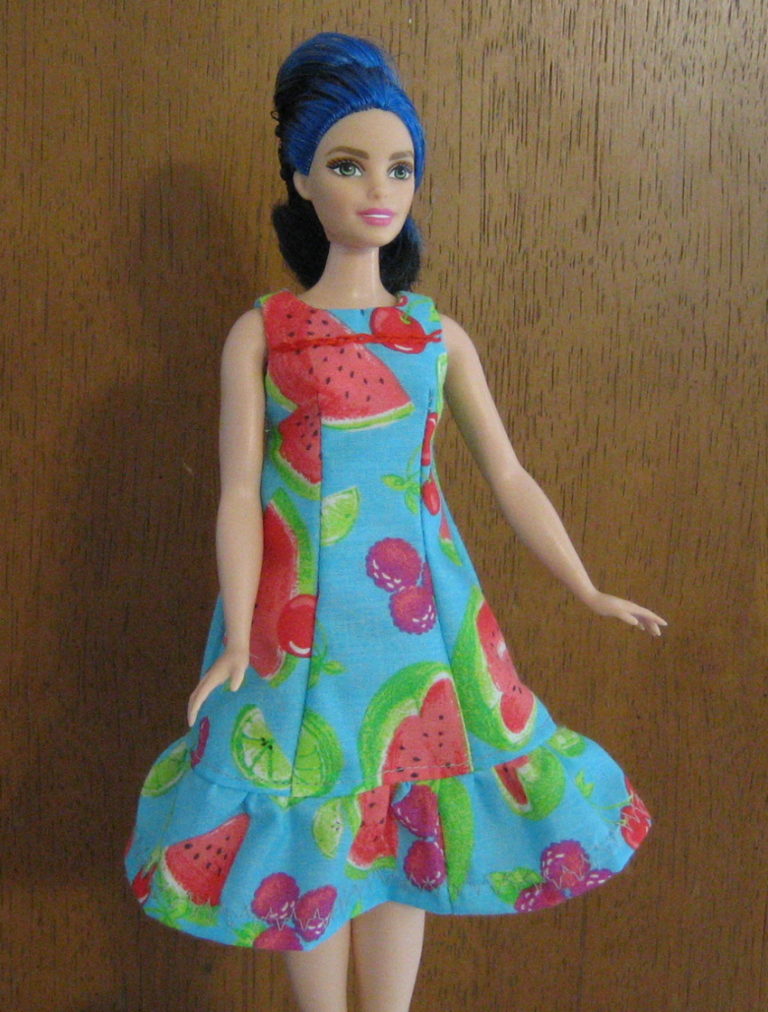
    I love Miss Blue’s beautiful space princess hair.

    Of course my first dress for her had to be a princess seams sundress. Princess seams are not a very easy design to create. I set out to do a strapless at first, but it didn’t happen and this did.

    Might be because I can identify with this lady, and this is the style that looks best on me.

    Just last week I couldn’t resist buying Fashionistas #63 too. She’s so very platinum that it almost looks grey, and I can imagine she’s just a very young-looking granny.

    Here she is in one of the test models of this pattern.

    And here is the pdf file to print Barbie Curvy Princess Pattern <– CLICK HERE TO DOWNLOAD

    INSTRUCTIONS


    Pattern includes 1/4” seams except at the neckline and armhole, there’s only 1/8” seams there.

    NOTE that your presser foot is probably wider than 1/4″. Don’t line up the fabric with the edge of the presser foot or the dress will come out too small. I drew a black mark on my machine so I know where a quarter inch really is.

    Place pattern on fold, cut one large shape for the dress and a shorter one for the facing. Cut through the fold in the back.

    Lay the facing and dress right sides together, stitch armholes and necklines with narrow seams. You have to be very careful and precise about this step. Flip over to be sure the seams are even.

    Then clip the curves.

    The next part is tricky but doable. To pull the back through the shoulders you’ll need a long tweezer or forceps.

    Reach through the shoulder, get the bottom corner of the back and pull through. Keep the bulk smooth. If it bunches up and you pull hard, it’ll rip those tiny seams.

    After the back section is through, gently ease the facing through.

    Stitch up the darts on the dress and facing. (That could have been done as the first step but it’s easier to have the whole thing lying flat while dealing with the shoulders.)

    After the darts, put facings right side to right side and sew down sides of facing, then continue, with the dress pieces rights side together, sew down the side seams as well.

    Tack the facing to the dress at the side seams.

    Fold the backs over, once as narrowly as possible then a little wider. Doesn’t hurt to try it on the doll at this point.

    That’s a cute length for a mini-dress and looks flattering on this body type.

    Unfortunately I’m allergic to curved hems, so I added a 13 x 3″ ruffle.

    And velcro. All done!

    A line of Velcro makes it easy for a young child to dress, or you can stitch the skirt up to the point marked on the pattern.

  • Make Charted Needlework Graphs in Adobe Illustrator CS5 using Live Paint

    Make Charted Needlework Graphs in Adobe Illustrator CS5 using Live Paint


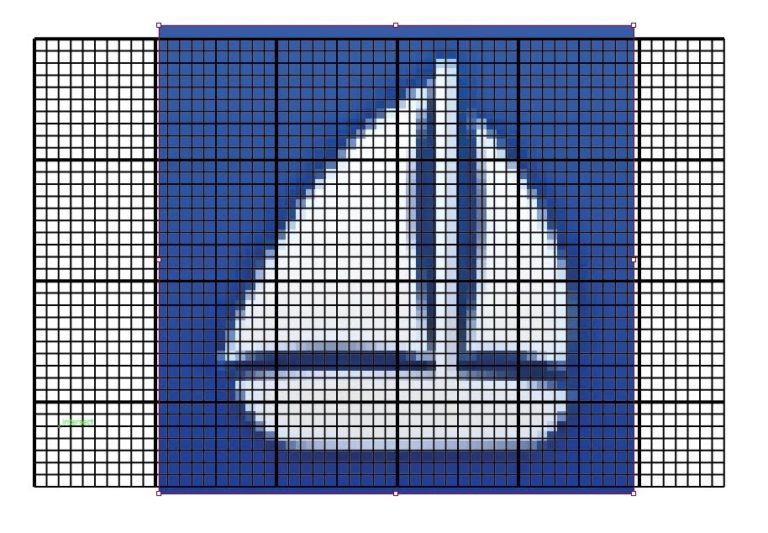
    The goal was to make a square chart for cross-stitch or needlepoint by tracing a background image onto a grid. I found various methods to make the chart, but nothing about how to color it other than resorting to something like bitmap painting with the fill tool.
    There are plenty of ways to automatically digitize a color picture into a charted design, but I wanted to be able to the colors for individual squares using my judgment about which squares should be which color.
    Adobe Illustrator has a way!

    The book cover I wanted to stitch with plastic canvas is 57×37 squares, so I need 58×38 lines.
    I decided to use 10 squares per inch because that’s easiest.

    So the vertical lines are going to be 3.8″ long.

    To do this, set the Stroke for 1 pt and create one line on the left side of the work area.

    Then create a copy .1″ to the right.

    Using the Move tool, click COPY. Now there are two lines.
    Then hit Ctrl+D (Transform Again) while counting out until there is the correct number of lines. 58 lines only takes a couple moments.

    Then select every tenth line using Shift + click. It’s easy if you line the whole group up with the 1″ mark on the ruler and zoom in.
    Change the stroke of those lines to 2 pt.

    Now the horizontal lines. Same deal. Easier if you create them off to the side a bit, for the later selecting of every 10th one.

    After that, scoot the second set to line up with the first. Voila! Graph paper in sections of 10!

    Then take the artwork to be graphed and put it behind the graph.

    I’m doing a simple two color sailboat from a logo from my farming game.


    I pasted the sailboat behind the grid then scooted it to be most naturally advantageous for stitching, with the mast filling two columns and the bottom of the boat filling up one row of squares.

    Once it’s in the right place, lock the image so it can’t be selected or moved.
    Select the whole grid above it and do Live Paint – Make
    Then find the Live Paint bucket tool or hit K

    Zoom in and start coloring individual squares. This is the tracing part, like in the old days when we used to trace designs using two sheets of paper held up against a window.

    In progress…


    You can click and drag the Live Paint bucket which saves some time.


    Honestly that’s as far as I’m going to take this one. It’s clear enough to print as a reference chart for stitching like I wanted. The beautiful finished piece is the needlework, not the chart!


  • Barbie 28 inch Peasant Top and Hawaiian Dress

    Barbie 28 inch Peasant Top and Hawaiian Dress

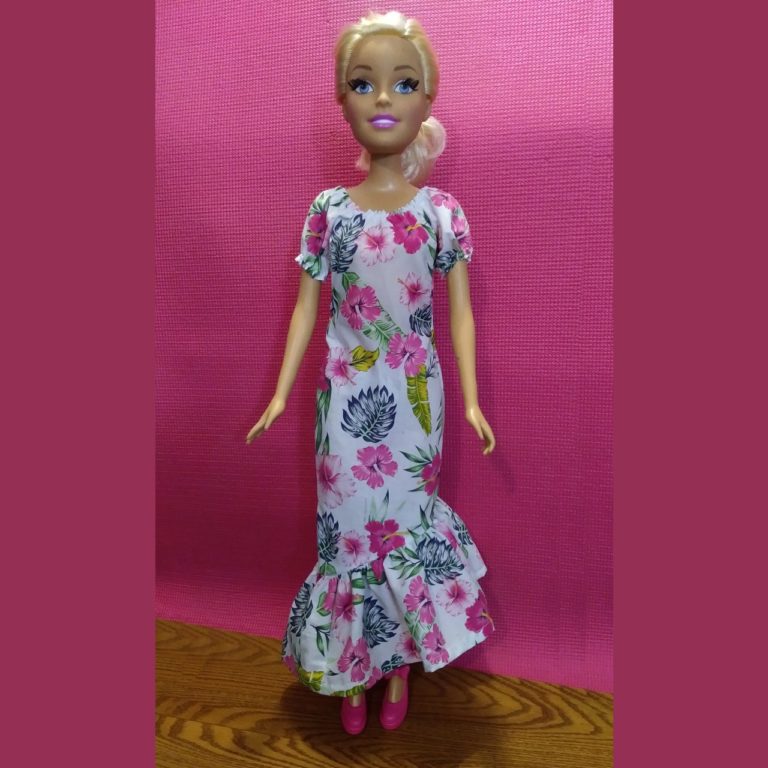
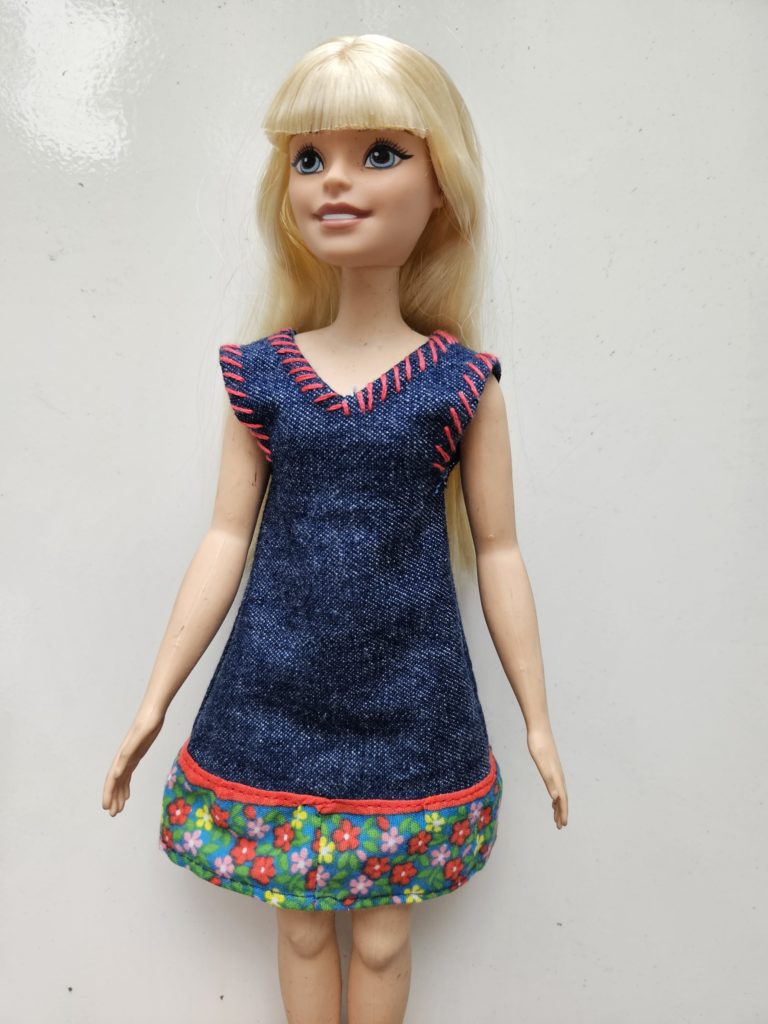
    Here’s another dress pattern to make your own outfits for Best Fashion Friend Barbie.

    NOTE this is NOT the regular height Barbie, this is the big 28 inch super sized one! But not 36 inch My Size Barbie either. I don’t have clothes for the 36″ one. For the regular size 11.5 inch tall Barbie clothes click that tag.

    Mattel image of little girl kneeling next to 28 inch Barbie

    I’m sharing this in late fall for the benefit of all of you grandmas who need to make doll clothing right now. I last worked on it in 2018 and haven’t gotten back to it yet so it’s not finished, just the basic pattern pieces. Here are some clothes I made during the testing process.

    Some of those have the side seams cut straight downwards instead of curved in.

    As you can see it fits 28 inch Descendants too.  (A dress for Evie is coming SOON.) 

    The red one was cut out of a pregathered garment, then I added a ruffle. Since the garment was already gathered, that made the skirt wide.

    Here’s another long tropical muumuu.

    Cute country girl Barbie. I think this was the first version I tried making more fitted, then didn’t like it and made a crop top instead. I’ll share that short skirt pattern here soon. 

    Another crop top version and that denim pencil skirt is coming soon, too. 

    The basic peasant top becomes a dress

    Enjoy for now. (CLICK HERE TO DOWNLOAD)

  • Barbie 28 inch Best Fashion Friend Classic Dress

    Barbie 28 inch Best Fashion Friend Classic Dress

    I realize this is Thanksgiving week and there are a lot of grandmas out there who need some 28″ Barbie clothing in a hurry, so I’m sharing this pattern for you, in its unfinished state. I’m planning to do more work on it later.

    Here is a dress I made from this draft back in 2018. I think I used the skirt that comes with the strapless bodice. I didn’t mark how long I cut the sleeve.

    Here’s the file. <– THIS IS THE DOWNLOAD LINK

    Instructions

    (Mar 2021) Okay, I made up a test from the current version of the pdf. This is with the long sleeves and using the skirt from the strapless dress pattern. The skirt from the strapless dress sets in to this bodice exactly, so for the black and plaid version I must have cut it a fair bit wider in order to gather.

    1/4″ seam allowances are included.

    I cut on the line for “optional lower neckline” and added a neck facing.

    Stitch the facing with 1/4′, clip, turn, and topstitch.

    Notice that 1/4″ is narrower than the presser foot. I have a black line drawn on mine to remind me. Stitch up darts by lining them up and then get a good eyeball of where the line will end. Try to stitch straight 🙂

    Gather top of sleeve cap and attach the sleeve, then stitch up the side seams. Then attach the skirt. I gathered it and then had to ungather, because there just wasn’t enough fabric. Definitely going to add more width to the skirt on the next test version.

    And here is one of the beautiful photos shared by Marisa Goodwin on a comment on the Feedback page. I mislaid that attachments but found it again. This is really the best place for it, I think. Thank you so much, Marisa!

  • Sushi Cushion to Sew

    Sushi Cushion to Sew

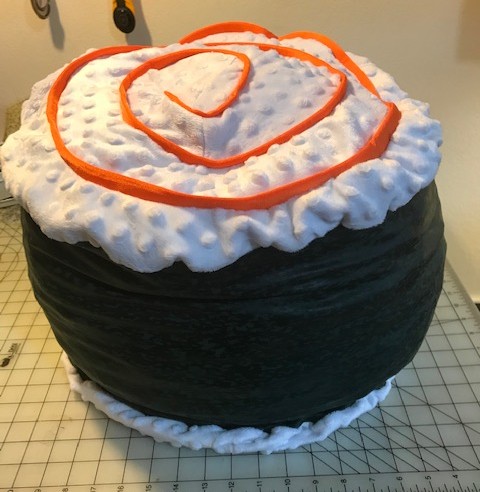
    Here’s a great project from a reader named Susan. She wanted to sew a sushi pillow as a gift for her grandson, and happened across my spirals page while looking for ideas.

    I had no idea “sushi pillow” was a thing, but when I googled for it, it looks like many people have made one. This version is a bit different from all the others, so its worth sharing, too.

    It’s a different idea from my other spirals. This one’s a simple circle with a circular stripe inside, drawn freehand on a piece of paper like this:

    And then cut out all of those black lines. That produces two spiral shapes without seam allowances. So the “rice” is cut from the thicker stripe and the “salmon” from the thinner, adding seam allowance while cutting. There will need to be plenty of marking to be sure the seams line up correctly for sewing.

    I haven’t tried this myself. I imagine it might be quite tricky, although Susan made it look easy! I have another idea for embedded spirals like this that I’ll probably try in the future.

  • Music-Themed Spiral Skirt

    Music-Themed Spiral Skirt

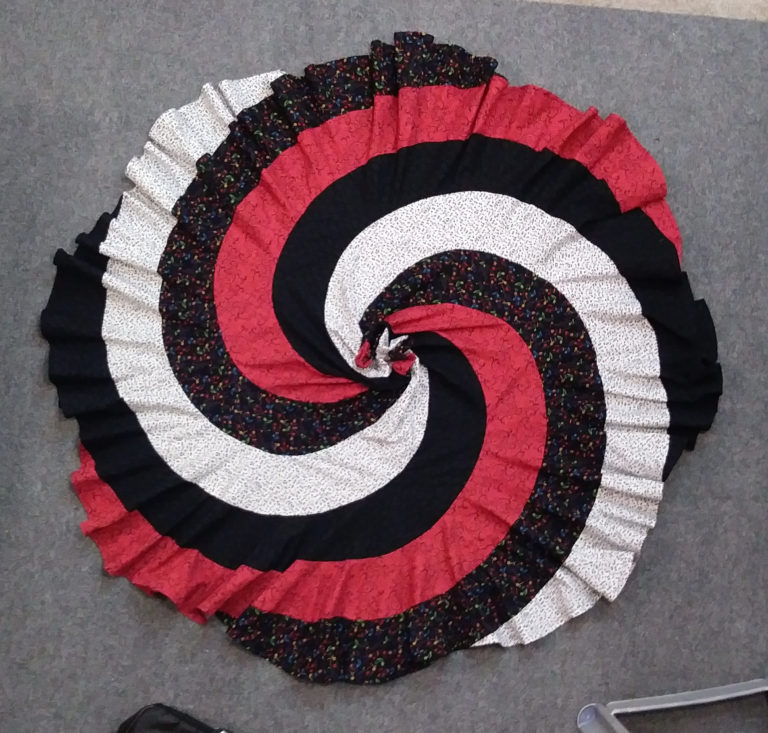
    Dramatic black, white and red music-themed fabric chosen by a musician.

    I only have a couple photos while it was in progress. Hopefully one day I’ll have a photo of it being worn!

    This was made from the patterns on the spirals page.

  • Adult Size Spiral Dress

    Adult Size Spiral Dress

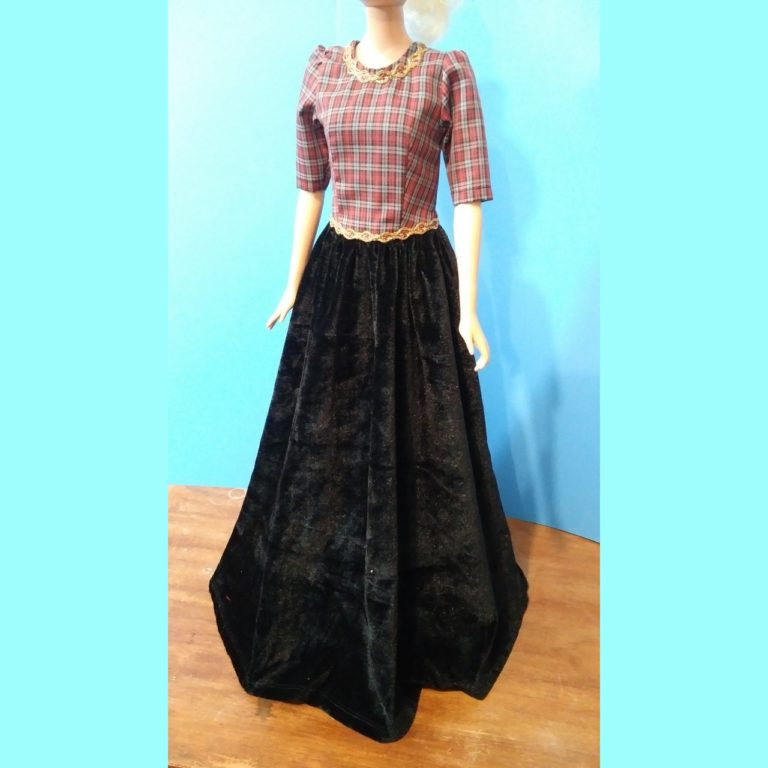
    Here’s a full length spiral dress for a grown-up woman! …with wolves on it.

    Long ago, I found a spiral dress at a second hand shop. It was too small for me, but I was so fascinated with those seams going round and round that I bought it anyway. Eventually I decided it was silly to own something I couldn’t wear, and donated it again.

    Later I wished I had kept it to cut apart and use for a pattern. That’s what got me going on spirals. The skirts were just a compromise because the top part was too intimidating.

    In the early years I merged a color blocked peasant top with spiral skirt sections, as you may have seen on the spirals page.

    But what I really wanted was the real deal, barber pole, candy cane, diagonal spirals top to bottom. 

    For about ten years I kicked around ideas for another way to make a spiral dress for myself. I would fall asleep thinking about it, but didn’t have enough of a clear idea to start cutting.

    Eventually got up my courage and set to work. First I tried shifting the darts, the way all the pattern instruction books told me to. For your entertainment, here are some of the fails:

    I found some ideas on the internet that had been drafted with CAD but not actually made into a dress, much less a dress for me. That made me feel my lack of skillz and didn’t help.

    Someone told me you can submit design ideas to Simplicity and they’ll make the idea into a pattern. Perfect! But although the chances of Simplicity making my design into a real thing might be small, I wasted a year thinking that one of these days I might download the sketching tool and actually draw it up and present it to them… ummm just nope, the chances of ever getting that done are not gonna happen.

    Then one fine day the solution occurred! And of course it’s very simple. What I needed was to start with a basic bodice pattern without darts, join the side seams so it’s a smooth tube, draw diagonal evenly-spaced lines on it with Illustrator, then measure how much the darts should indent in the front and back, and scoot the lower edge of those diagonal lines in that much. Voila!

    After printing and cutting the pieces apart I just wrote ADD SEAMS on both sides of each of the diagonal pieces because that was easier.

    Then there was a prototype that fit, and I was so excited I forgot to take a picture.

    The next difficulty was to choose four fabrics with enough contrast but some kind of harmony. I spent a while moving pieces of fabric around, then came across that fat quarter of running wolves I’d picked up somewhere and was dying to find a use for, and the whole thing just fell together. I had a variety of green and foresty scraps, and I think the bears went along with the wolf theme just enough to make it all look intentional.

    Looking intentional is important to me. I want there to be no doubt that I did this on purpose.

    Results EXACTLY what I’ve been dreaming of all these years.

    Grin and bear it!

    Okay. I’ll do my best to write this from memory. I’m now in my offgrid camping paradise, so make allowances.

    So. How to do this.

    Look for a top or dress pattern that the shoulders and armholes fit you okay, either with two darts going straight down (not into the armholes) or a “baby doll” style dress without darts. If it has darts, ignore them for right now. Basically we just want the top shape with the shoulders and armholes the right size.

    Trace the front and back pieces flat out on large paper (the back of heavy gift wrap paper works well).

    Right in the middle, bosom height or thereabout, divide the width into fourths, like in this image.

    Your pattern probably already has seam allowances, so mark inwards a bit from the side edges to compensate for those.

    Use whatever means at your disposal to make diagonal lines evenly at the same angle from those center three markings and from the mark directly on the side seam (under the armhole).

    Mark the pieces so they don’t get mixed up. I used F1, F2, F3, F4, B1, B2, B3, B4

    Now you need to add darts. If the pattern had darts it’s easy, measure the darts. Or, figure out how much your waist measurement is smaller than breast level measurement, and take away that much by trimming the bodice pieces that end about in the middle front and back. Front darts are of course bigger than back darts.

    Look at this picture again–
    (except that this picture actually shows me cleverly cutting two of the pieces together to ELIMINATE one of the seams so that my bear print stayed as intact as possible, sorry, that’s the only one I have until I make another of these) —

    Cut the pattern apart on one of the middle lines, then tape the side seams together, overlapping enough to remove the seam allowances. Then cut apart all the lines so you now have eight bodice pieces.

    Mark ADD SEAMS all down those diagonal lines that you drew.

    Those are the bodice pieces.

    For the skirt, go to my Spiral Skirts page and pick a curved C-shaped spiral pattern piece that is comfortably larger than any of your bodice pieces. For the first segment, trim away the BACK (the larger side) to fit with your bodice piece. Like this–

    NOTE that it’s VERY IMPORTANT to add plenty of fabric rather suddenly, to swirl out for the hips, or you’ll end up with too column-like a dress. The bodice pieces should be quite short, almost empire-height, so that the skirt starts high enough to flare out enough. This pink and blue one was my second try and it didn’t come out (and it was 98% done by the time that became apparent) because I made the bodice pieces too long didn’t make it flare enough at the hips. It looks okay but there’s really not enough room. I’m thinking on a future test I might even try gathering the skirt gores to the bottom of the bodice pieces.

    Then proceed like making a spiral skirt, sewing the seams from top to bottom with a narrow seam allowance.

  • Free Peasant Dress Pattern for 18″ Girl Doll

    Free Peasant Dress Pattern for 18″ Girl Doll

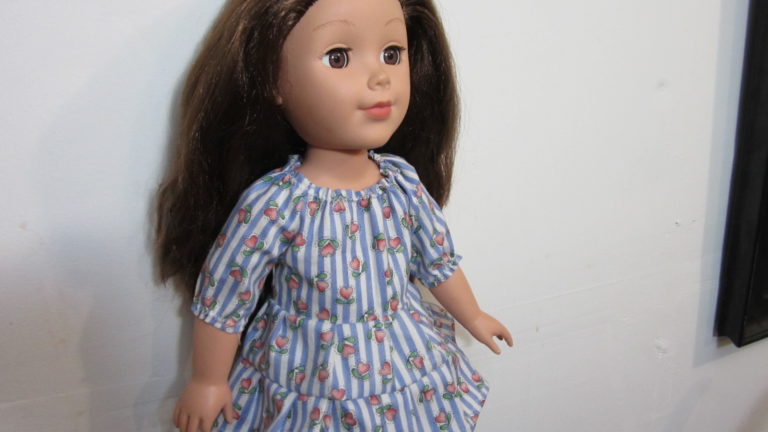
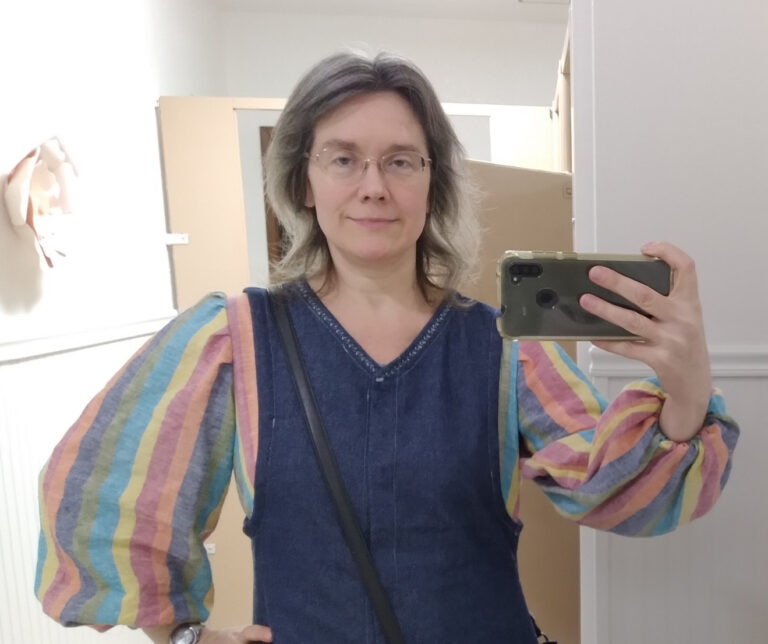
    To my delight, I was gifted a Paradise Kids 18″ doll that needed some clothing. I got right to work making her something.  Here we are with a basic peasant dress, but this is only the beginning. I have something else in mind, something VERY cool, you’ll see!

    It might be ten years from now with my track record, but hey.

    Here’s the sewing pattern pieces to print – 18inch doll peasant pattern

    Sew the sleeves to the front and the backs to the sleeves, then gather by whatever means necessary (zigzag over a piece of string and pull it up) to make the neckline 10″ and the sleeves 4.5″.

    Then fold over the back edges and add velcro or snaps.

    As usual there’s no pattern piece for the skirt. It all depends on what size and shape the scrap of fabric is that I’m using.

    For this one I put little pleats into strips of fabric to make tiers.

    Note about Sizing

    I looked at the Carpatina page for info about sizing, particularly this sketch–

    This Paradise Kids girl has a 10″ waist and 12″ belly.  Her shoulder width is 3.75″ across, right between the two above.  So I guess this would fit on Journey Girls also, but not American Girl.

  • Crocheting for Relaxation

    Crocheting for Relaxation

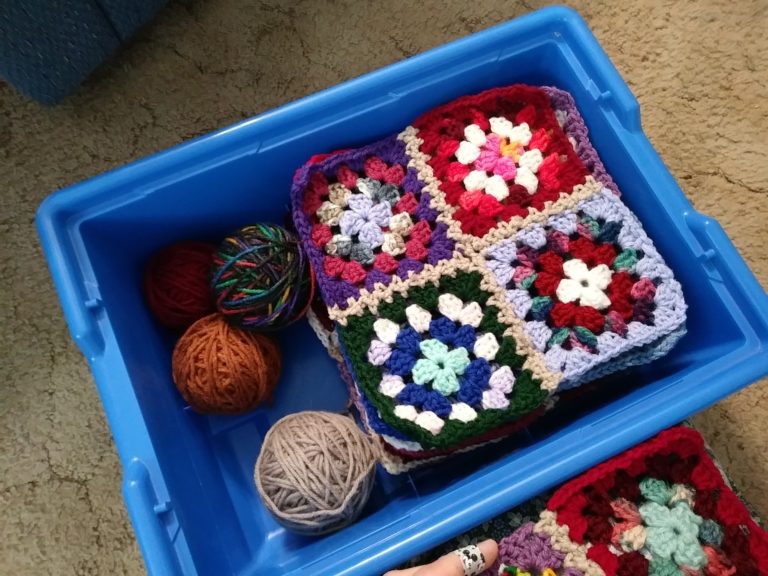
    Yarn is a very good thing for PTSD symptoms  🙂

    Here’s my latest scrapghan project.

    No, that’s the old one!  I started that long ago, at the other place, and had worked on it in little bits for so many years that it had acquired a feeling of should. “I’ve worked on it for so long, and it’s so large by now, that I should finish it.”

    What an unpleasant feeling of conforming to some imagined expectation! Does anyone care what I do with my own yarn? Nope. Nobody does. It’s just my imagination, like many of the non-existent external pressures that I allowed to dictate my behavior over the years.

    Whoops, as always, it’s so easy to dive in too deeply.

    Back to yarn.

    I pulled it apart, and now there’s a pile of great scraps, again.

    I started making basic granny squares, those charming little motifs of extreme simplicity and ultimate soothe. Zero thought required. It serves the same purpose as adult coloring, which has become so fashionable these days, except the crochet takes shape and becomes something useful. 

    The only thought needed for this is more of a feeling, using vision and taste to arrange these little randomy bits into harmonious mini-compositions.

    I was looking for some way to carry the yarn scraps around with me that wasn’t just piling them all into the bottom of a bag. Discovered this zipper shopping bag with some structure to it, and used the bottoms of three small boxes to stack inside it.

    It is convenience itself! Then zips up and looks tidy, so I’m not obviously a poor old wreck carrying her yarn around to keep her wits together.

    And this was DONE in no time–

  • A Better Spiral Crochet Granny Square

    A Better Spiral Crochet Granny Square

    I found lots of ideas that were cool and artistic, but they seem to be more complex, more work and less “granny”. The beauty of the granny square is its utter simplicity. I wanted that same classic shape, only in four colors.

    Only the first round needs to be modified, to attach and spin the four colors. After that, it’s pretty much the standard granny pattern.

    Chain 5, join to form a ring. Chain 5, then 3dc in the ring.

    Make several chain stitches to hold things in place while you drop that color and pick up the next one, then you’ll pull those out when you work with that color again.

    Pick up the next color, attach to the ring, make 5 chain, then 3dc. (Then add several chain stitches that you’ll pull out later)

    Repeat with the 3rd and 4th colors. Now there are four colors in the ring.

    Ch 1, and in the next color’s 5 sc loop, put 3dc, ch2, 3dc.

    Do that same thing in the next three colors’ ch5 loops.

    After that it’s standard granny. In the ch2 corners do (3dc, ch2, 3dc) and in the ch1 sides do (ch1, 3dc).

    Is that clear? Suggestions / mistakes let me know plz 🙂

    Carry on the color you’re working with until you get to the end of the color below it, pick up the color below and work on that round for a while.

    Like this– .

    To keep the yarn from ending up in a mess, have a container for whatever color ball you’re working with and the other three can be loose.

    There’s another sample.

    Spiral granny crochet square – sample 2

    More to come. It went like all my projects – I “solved the puzzle” then forgot about it for a couple years. I just picked it up again, 2408.

    If you make something cool with this, I’d love to see it!